How to Back Up Proxmox VE with NAKIVO Backup & Replication
Proxmox Virtual Environment (VE) is a free, open-source virtualization management platform based on Debian Linux with a custom kernel. This solution fully integrates the KVM hypervisor, allowing users to deploy and manage virtual machines via a user-friendly GUI web interface.
Proxmox comes with Proxmox Backup Server, a native tool to back up virtual machines. However, you may need to use advanced backup/recovery features such as direct backup to the cloud, application-aware backup, flexible scheduling and retention, immutability, granular recovery, etc. Moreover, in hybrid and mixed environments, it is easier to use a single third-party backup solution like NAKIVO Backup & Replication to manage all data protection activities from a centralized interface.
This blog post covers agentless VM backup to protect Proxmox VE infrastructures and explains why agentless backup is the optimal solution compared to agent-based backup. Proxmox agentless backup configuration in the NAKIVO solution is explained.
What Is Agentless Backup?
Agentless backup is a newer approach for VM backup that involves backing up an entire VM at the host level (from a hypervisor) including all VM files. This is a more efficient approach for virtual machines and provides advantages compared to agent-based backup. Agentless backup of VMs is image-based, and a backup chain can contain full and incremental backups.
To make this approach possible, vendors of hypervisors and virtualization solutions have developed special Application Programming Interfaces (APIs) for data protection components to access VMs and VM data from the hypervisor’s side, that is, outside the VMs rather than inside VMs as it is the case with legacy backup.
A backup application interacts with a hypervisor via APIs, initiates VM snapshot creation for VM quiescing (freezing), including using VSS inside a VM, and backs up the whole VM content, including virtual disks and VM configuration files. A special component of backup applications can be installed on a hypervisor server to interact with the centralized backup solution.
The advantages of agentless backup
Agentless backups provide many advantages in virtual environments:
- Rational resource usage. Agentless backup consumes fewer resources and has a lower impact on CPU and RAM of VMs and a hypervisor host when running a backup job compared to agent-based backup. Using native mechanisms to track changed blocks on virtual disks makes the process of incremental backups more effective and allows you to save time with shorter backup windows and disk space on backup storage.
- Operational efficiency. Administrators can add a virtualization server, such as a Proxmox VE host, to a backup solution centrally, and all VMs residing on this host can be protected without installing an agent on each VM. Administration and maintenance is easier and more efficient. Only the guest tools supported by the hypervisor must be installed on a VM (virtio drivers for Proxmox VMs are the analog of VMware Tools for VMware VMs).
- Cost efficiency. Agentless backups are cost-efficient due to lower hardware resource consumption and higher operational efficiency. A licensing scheme for a backup solution can be more attractive when choosing an agentless backup compared to buying per-agent licenses to protect each machine.
- Full and granular recovery. Agentless backups allow you to recover full VMs faster and with fewer actions. You don’t need to create an empty VM with empty virtual disks and configuration files. You just select a host where to recover the VM and storage where to recover the VM files. All VM files and configurations are recreated directly from the backup with an agentless backup solution. Granular recovery is also possible when using this approach, which allows you to recover individual files from a backup (depending on a backup vendor).
NAKIVO’s Agentless Backup Solution for Proxmox VE
NAKIVO Backup & Replication is a universal data protection solution that supports host-level agentless backup for Proxmox VE, VMware vSphere, Microsoft Hyper-V, and Amazon EC2. The solution also supports agent-based backup for physical Windows and Linux machines as well. Now, the NAKIVO solution supports an agentless backup functionality for Proxmox VE.
The following features are supported by the NAKIVO solution for agentless Proxmox VM backup:
- Image-based backup, app-aware backup of VMs at the host level.
- Granular recovery of specific files and directories from a backup to a custom location or original location.
- Incremental backup using native Proxmox technology to increase backup speed and reduce the consumption of storage space in backup repositories. Support for native changed block tracking for VMs. Two approaches are supported: forever-incremental and incremental with full backups for higher reliability.
- Different backup locations. You can store backups on local storage, SMB and NFS shares, deduplication appliances and configure Proxmox backup to cloud storage (Amazon S3, Wasabi, Backblaze B2, Azure Blob, etc.), as well as S3-compatible object storage. Backup copy to tape and different public cloud platforms are supported too.
- Immutable backups. You can enable backup immutability for a specified period to increase cyber resilience against threats like ransomware. Ransomware and unauthorized users cannot modify or delete backup data that is made immutable.
- Encrypted backups. In addition to immutability, you can enable backup encryption to ensure that backups are protected against data breaches and theft. Encrypting and decrypting backup data requires setting a password.
- Backup automation. Flexible scheduling and retention settings allow you to run backup jobs automatically and use the GFS retention policy and other custom retention policies.
Let’s take a look at how agentless Proxmox backup will be configured in NAKIVO Backup & Replication to protect virtual machines running on Proxmox servers.
Adding Proxmox VMs to the NAKIVO Inventory
First, we need to add our Proxmox host to the NAKIVO Backup & Replication inventory to discover VMs residing on the host. Do the same if you’re using a Proxmox cluster.
- Open the web interface of NAKIVO Backup & Replication provided by the NAKIVO Director component.
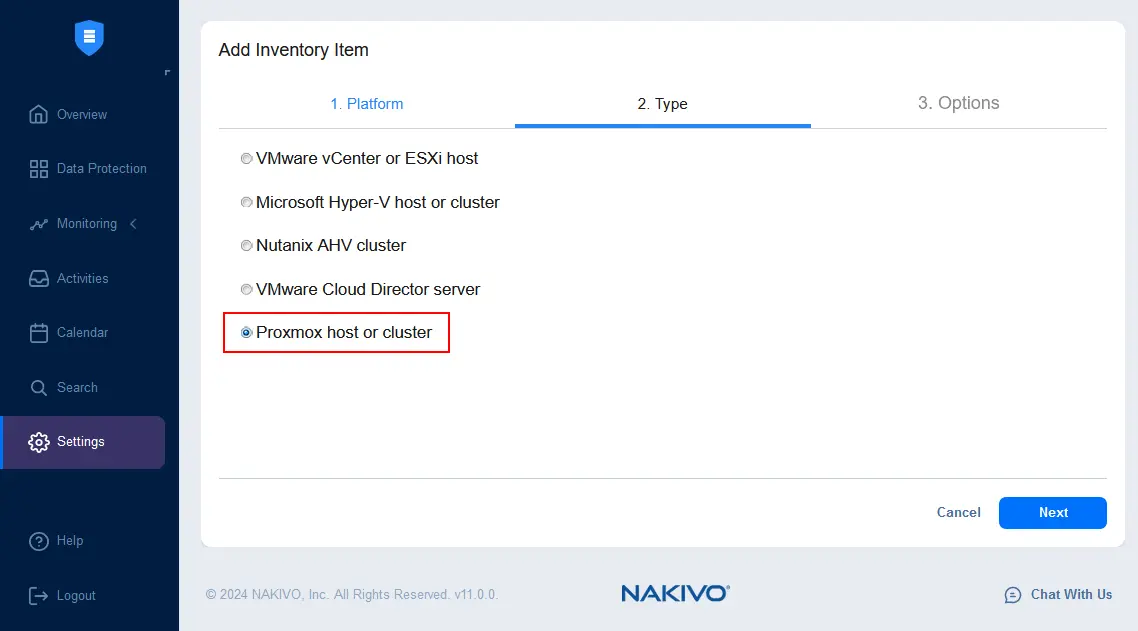
- Go to Settings > Inventory and click + to add a new item to the inventory.

- For the platform, select Virtual and hit Next to continue.

- Select Proxmox host or cluster as the virtual platform type.
- At the Options step, enter the required parameters of your Proxmox host or cluster to add this item to the NAKIVO inventory:
- Display name: The entered name will be displayed in the inventory. In this example, we enter Proxmox Server 226.
- Type: Select Standalone Proxmox host or Proxmox cluster. We select a standalone host in this example.
- Hostname or IP: Enter the IP address or hostname of the Proxmox host (192.168.101.226 in our case).
- Username: Enter a username with administrative (root) permissions.
- Password: Enter the password for this user.
- Web interface port: By default, port 8006 is used.
- SSH port: By default, port TCP 22 is used. If you configured an SSH server to use another port, enter the port number in this field.
- Temporary file location: /tmp (by default)
Hit Finish to add the Proxmox host to the inventory.

A Proxmox host has been added to the inventory. Go to Settings > Inventory to see all added inventory items. We have our Proxmox server as well as a Hyper-V host and an ESXi host.
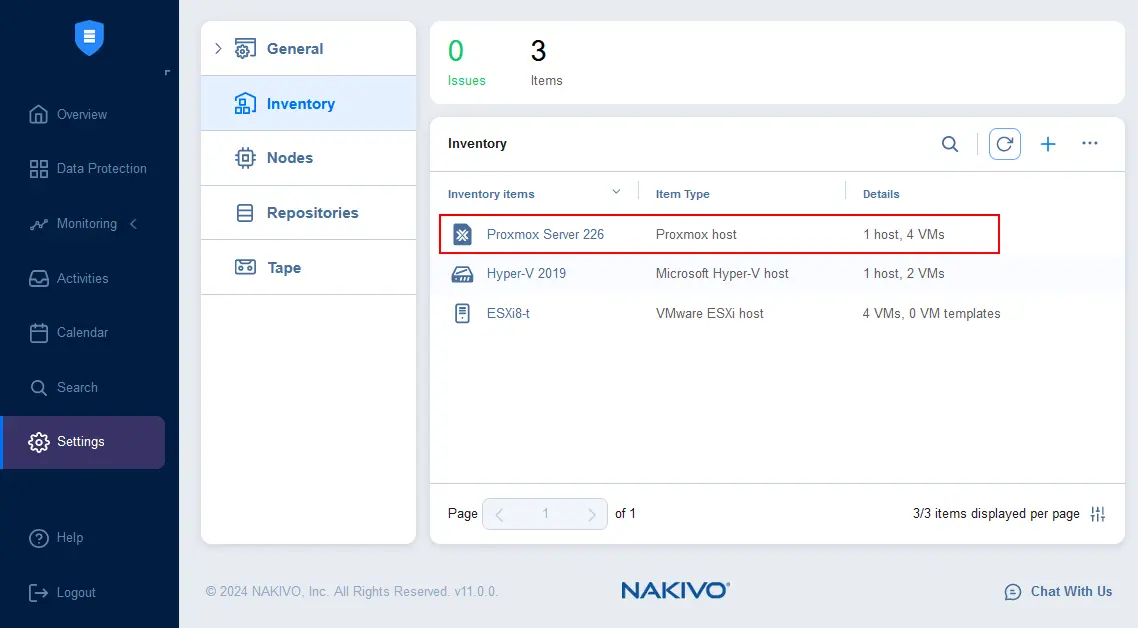
Note that when adding a Proxmox host to the Inventory, the Transporter component is automatically installed (injected) on the Proxmox host. In the case of a cluster, a Transporter is installed on each Proxmox cluster node. You can check the added Transporters in Settings > Nodes.

You can also watch a video of how to add your Proxmox VE items to the NAKIVO Backup & Replication Inventory and create your first backup job.
Creating a Proxmox VM backup job
When all needed Proxmox hosts and clusters are added to the inventory, you can create Proxmox VM backup jobs.
Go to Data Protection, click the + (plus) button, and hit Backup for Proxmox VE in the Jobs menu that opens to create a new backup job.

The New Backup Job Wizard for Proxmox VE opens. Complete all the steps of the wizard:
- Source. Select the Proxmox VMs you want to back up. You can select any VMs located on Proxmox hosts or clusters added to the inventory. Let’s select the Debian12 VM. Click Next at each step of the wizard to continue.

- Destination. Select a backup repository as a backup destination to store Proxmox VM backups. We select a local backup repository in this example. But you can create repositories on other platforms like public clouds, S3-compatible storage, deduplication appliances, etc.

- Schedule. Configure scheduling and retention settings. You can configure flexible schedules by adding multiple rules. At this step, you can configure backup immutability to protect Proxmox backups against new ransomware infections. Select the checkbox Immutable for and enter the number of days you want the backup to be protected.

- Options. Configure Proxmox backup job options:
- Job name: Enter a job name that will be displayed in the list of data protection jobs, for example, Agentless backup for Proxmox VE.
- Job Priority: 5 (default). You can set the priority if you’re running multiple jobs simultaneously (if they overlap in the Calendar).
- App-aware mode: Enable or disable the application-aware mode for backups.
- Changed tracking: Select a mode to track changed blocks of virtual disks for incremental backups.
- Use native change tracking. Native Proxmox changed block tracking is used. This is the recommended option as it ensures the fastest job completion for incremental backup jobs.
- Use proprietary change tracking. NAKIVO solution proprietary changed block tracking mechanisms are used.
- No change tracking (always full). Changed block tracking is disabled, and backups are always full.
- Configure network acceleration (compression) and network encryption options.
- Backup encryption. Configure a password to encrypt backups at the source before they are transferred to the repository.
- Configure full backup settings if you use incremental with full backups for higher reliability. You can select the period and full backup mode (Active full or Synthetic full).
- Select additional options if needed.
Hit Finish or Finish & Run to run the Proxmox VM backup job.

Wait until the agentless Proxmox VM backup job is completed. You can monitor the progress in the Data Protection dashboard or Activities dashboard.

We can now create a new file inside the backed-up VM and run an incremental backup that will only include the new data blocks in the incremental recovery point. In this example, we create the dt1_copy.txt file in the /opt/ directory.

To run a backup job once again (before a scheduled run), select your backup job in Data Protection > Jobs and click Run.

Select the Incremental backup type and retention settings (to keep recovery points for 30 days, for instance) and hit Run.

Wait until the incremental recovery point is created.
How to recover Proxmox VM data
Proxmox VM data recovery from a backup is straightforward with NAKIVO Backup & Replication and can be done in a few steps. You can perform:
- Full VM recovery from backup
- File-level recovery
- Object level recovery: Restore Microsoft Active Directory, Exchange Server and SQL Server objects.
- Backup export allows you to recover a Proxmox VE virtual machine as a VM on another platform, for example, recover a Proxmox VE VM to Microsoft Hyper-V or VMware ESXi.
- With Universal Object Recovery you can recover any object used by an application directly from a backup to where you need it.
Let’s look at how to recover individual files from a Proxmox VM backup in this example.
- In the web interface of the NAKIVO solution, go to the Data Protection dashboard, select the agentless Proxmox backup job (that was successfully run at least one time before), and click Recover.
- In the Proxmox recovery menu that opens, select the recovery method. You can use one of the granular recovery methods to recover individual files and objects or use full VM recovery. Let’s select Individual files and recover specific files from a VM backup.

- Select the Proxmox VM backup in the list of backups. You can select multiple VMs to recover from a backup. A backup can contain VMs from different Proxmox hosts. Then select a recovery point for the backup.
In this example, we select a VM called Debian12 as a backup to recover files by using the latest recovery point. Click Next at each step of the recovery wizard to continue.

- Select the recovery method to recover files from the VM backup:
- Download to browser or send via email
- Recover to the following server
- Recover to file share
Let’s download the recovered files in a web browser.

- Select files to recover. We select /opt/dt1_copy.txt on the logical volume 2 to recover. This file was written to a backup after running the incremental backup job.

- Specify recovery job options. Select a recovery type, such as Download. Click Recover to proceed and download the needed files from the Proxmox VM backup right away.

Wait for the Proxmox VM file recovery job to complete from the backup. You can view the progress in the Activities tab. Don’t close this page until you download the recovered files in your web browser.

You can also perform full Proxmox VM recovery from a backup in just a few clicks.
- Go to Data Protection, click Recover and hit Full recovery for Proxmox VE.

- Select a backup, then choose virtual machines and recovery points. Click Next to continue.

- Select the destination for full VM recovery.
- Container: Select a Proxmox host or cluster.
- Storage: Select a Proxmox datastore.
- Network: Select a virtual network in Proxmox VE.
- Pool: Optionally, you can select a resource pool if used.

- Specify recovery job options. Enter a job name, configure network acceleration, network encryption and other options. Click Finish & Run.

Conclusion
Agentless backup for Proxmox VMs is an effective method for protecting virtual machines, allowing you to quickly recover data when needed. NAKIVO Backup & Replication supports agentless backup for Proxmox VE with a wide range of advanced features including incremental backup, full VM recovery, granular recovery, backup to cloud and more.