Connecting Office 365 Exchange Online with PowerShell: A Step-by-Step Guide
Managing Microsoft 365 with all the applications using a GUI in a web browser can be convenient – but only to a certain extent. The two interfaces IT pros use the most are Exchange Admin Center and Office 365 Admin Center. However, when you need to manage hundreds of Microsoft 365 accounts across an organization, the command line interface (CLI) can be a more efficient solution. You can use it to apply Exchange Online commands unavailable in the Admin Center.
As an admin, you can manage Microsoft Exchange Server via the command line interface in Microsoft’s PowerShell. The problem is that the usual cmdlets usable in an on-premises Exchange Server environment won’t suit the cloud-based Exchange Online. You need to install Exchange Online Powershell modules to enable PowerShell cmdlets in Office 365. In this post, we explain the various ways to connect Exchange Online to PowerShell. Using cmdlets in Exchange Online helps streamline management, thus saving time and effort.

Preparing Your Environment
System requirements
To connect Exchange Online to Powershell, ensure that your system meets the following requirements:
- Windows 7 SP1, or newer desktop Windows versions and Windows Server 2008 R2 SP1, or newer server Windows versions. In addition to the Windows Management Framework 3.0, 4.0, or 5.1, the .NET Framework 4.5 or later version installed is required.
- Internet connection: Open TCP port 80 to establish a connection between your local machine and the destination host.
- The current user with Exchange Online PowerShell has access enabled. Admin accounts have this access available by default.
You can enable access to connect to Exchange Online PowerShell for a specific account with the following cmdlet:
Set-User -Identity user@domain.com -RemotePowerShellEnabled $true
Installing Exchange Online PowerShell module
Installing the Exchange Online PowerShell module is necessary because it comprises cmdlets and thus enables Exchange management for a tenant. In this guide, we install the Exchange Online V2 PowerShell module.
However, you may want to check if the Exchange Online module is already installed on the client machine. To do that, run the following cmdlet:
Get-Module -ListAvailable -Name ExchangeOnlineManagement
If you don’t find the module, proceed with installation. You can install the Exchange Online Powershell module with a single PowerShell command. To start the process, run Windows PowerShell as an administrator, then execute the following cmdlet:
#Install Exchange Online Management Module
Install-Module -Name ExchangeOnlineManagement -Force
In case the system requires you to confirm the installation from an untrusted repository, press Y to proceed.
If the Exchange Online PowerShell module is absent in your system, the following error message is displayed:
Connect-ExchangeOnline: The term ‘Connect-ExchangeOnline’ is not recognized as the name of a cmdlet, function, script file, or operable program.
You can update the module with this cmdlet:
Update-Module ExchangeOnlineManagement
Setting Up the Connection
In this guide, we cover the two main methods used to connect PowerShell to Exchange Online: manual and automated setup.
Manual setup
Let’s start with the manual method to better understand the configuration process:
- Open Windows PowerShell, and choose one of the following to proceed:
- Hit Start, type cmd, then right-click the Command Prompt item. In the context menu, select Run as Administrator.
- OR go to Start > Windows PowerShell. Right-click Windows PowerShell, then select Run as Administrator in the context menu. Running PowerShell in the admin mode enables you to run cmdlets without limitations.
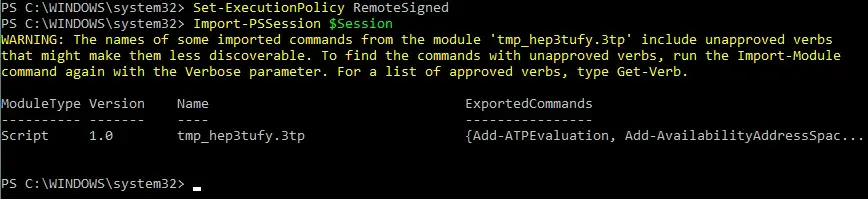
- Scripts should be enabled to use PowerShell properly. To execute scripts, you need to set the policy to RemoteSigned. Run this command to set the execution policy:
Set-ExecutionPolicy RemoteSignedConsider running this cmdlet right when you start configuring PowerShell for Exchange Online and Microsoft 365 management. Otherwise, your subsequent attempts to run the
Import-PSSessioncommand will result in the following error:Import-PSSession : Files cannot be loaded since running scripts has been disabled on this system. Provide a valid certificate with which to sign the files.
- In case the system requests confirmation, hit Y to confirm the policy change. Also, you can use the Unrestricted policy with this cmdlet:
Set-ExecutionPolicy UnrestrictedBy default, the execution policy mode is Restricted.
- You need to create a credential object and provide your admin login and password in the pop-up window to enable Exchange Online access. The user getting access needs Microsoft 365 global admin permissions.
$Credential=Get-Credential - The system then saves the provided credentials as the $Credential variable to use in the following command.
- Use the New-PSSession cmdlet to create a remote PowerShell session. Run the following:
$Session = New-PSSession -ConfigurationName Microsoft.Exchange -ConnectionUri https://outlook.office365.com/powershell-liveid/ -Credential $Credential -Authentication Basic -AllowRedirectionNote: In this cmdlet, we set the target URL of the cloud Exchange Online server, which must accept the request. After you run the command, Microsoft 365 cloud servers give you access to the Exchange Online virtual server associated with your current Microsoft 365 account.
- You need to import Exchange Online PowerShell cmdlets to the current session. Here is the command to use:
Import-PSSession $SessionDuring the import process, you can see the progress bar.
- The following message shows up after the command is completed successfully:
NOTE: With the MFA (multi-factor authentication) used for a Microsoft 365 account, the standard cmdlets we mentioned previously won’t work. To connect PowerShell to Exchange Online with MFA enabled, run this:
Connect-EXOPSSession -UserPrincipalName YOUR_UPNIn this cmdlet, YOUR_UPN stands for the user principal name, which is the name of the Microsoft 365 account you are using. You might need to install a different module here: Microsoft’s Exchange Online Remote PowerShell Module.
Remember that this module may be inconvenient to run time-consuming scripts because the session ends after one hour while you’re using it. Also, consider using Trusted IP addresses (that is, the IP addresses of your organization). This can help you bypass MFA when connecting Exchange Online PowerShell from your organization’s network.
- After the connection to Microsoft 365 and Exchange Online is set, you can start managing your Office 365 cloud environment. You can run a cmdlet to check if the connection is working. For example, try viewing the list of available mailboxes with this command:
Get-MailboxThe next cmdlet can provide the list of available Exchange Online PowerShell commands:
Get-Command -Module tmp* - After your work with Exchange here is over, terminate the session. This practice is recommended for both security and performance optimization. Here is the cmdlet:
Remove-PSSession $SessionNOTE: You won’t see any message after this command is executed. To check if the session is successfully removed, you can use the same
Get-MailBoxcommand. If the session has been disconnected, you’ll see the error that running Exchange Online cmdlets is impossible.
The number of sessions that you can open at a time is limited. You can run three sessions simultaneously, and, if you don’t disconnect any of them, you’ll need to wait for the session to expire before connecting to Exchange Online PowerShell with a new session from another PowerShell console.
Automated setup
In addition to the manual approach, you can connect PowerShell and Exchange Online using the automation capabilities of PowerShell. Automation reduces the number of commands you need to use, thus accelerating the configuration process.
Proceed as follows:
- Download the script. In our example, the script file is called ConnectExchangeOnlinePowerShell.ps1
- Find the script file in the directory after the download. We have the script at C:\temp_win\.
- Before you execute the script, set the script execution policy to RemoteSigned using this cmdlet:
Set-ExecutionPolicy RemoteSignedThis allows you to avoid the following error:
The file C:\temp_win\ConnectExchangeOnlinePowerShell.ps1 is not digitally signed. You cannot run this script on the current system.
The Bypass execution policy applied also enables you to avoid this issue. Here is the required cmdlet:
Set-ExecutionPolicy -Scope Process -ExecutionPolicy Bypass - Confirm the changes in the execution policy by typing Y.
- You can now proceed with the script. If MFA isn’t enabled for your Microsoft 365 account, the script won’t require additional arguments:
.\ConnectExchangeOnlinePowerShell.ps1If MFA is enabled in your Microsoft 365 environment, use the command as follows:
.\ConnectExchangeOnlinePowerShell.ps1 -MFA - After the connection between Exchange Online and PowerShell is successfully set, you can start using cmdlets to manage user accounts, mailboxes, among other items, and workflows. For example, with this cmdlet you can get the list of available user mailboxes:
Get-MailboxAlso, you can use the script to schedule and further automate workflows. For example, connect to Exchange Online without providing credentials. The script enables you to add login and password as execution options:
./ConnectExchangeOnlinePowerShell.ps1 -UserName admin@your_domain.com -Password your_passwordNote that providing your passwords as plain text in the script’s command line may be a security concern if there’s a data breach.
- The limitation for not more than three running sessions still remains, so you might want to terminate your session after finishing your work with Exchange Online PowerShell. The cmdlet to terminate the session is as follows:
./ConnectExchangeOnlinePowerShell.ps1 -Disconnect
How to Manage Exchange Online via PowerShell on MacOS
There are several ways to install PowerShell on MacOS. The most convenient and straightforward method is downloading the client directly from Microsoft’s site. PowerShell supports Apple Silicon CPUs in version 7.2 or newer.
Keep in mind that you need a Mac running at least macOS11 Big Sur. After the PowerShell package is installed on such a device, use either the manual or the automated configuration approach we described above to connect your PowerShell to Exchange Online.
Using PowerShell with Exchange Online
With PowerShell cmdlets, you can optimize the time and effort spent on Exchange Online management.
Some of the basic cmdlets look like the following:
New-Mailbox– to create a new user mailboxSet-Mailbox– to adjust the settings of an existing mailboxGet-Mailbox– to display information about available mailboxes across the environmentRemove-Mailbox– to delete a mailbox from Exchange Online
To view the list of available PowerShell cmdlets, use this command:
Get-command -Module ExchangeOnlineManagement
Lastly, check this script sample. The script allows you to get all mailboxes from Exchange Online:
#Import PowerShell module for Exchange Online
Import-Module ExchangeOnlineManagement
#Connect to Exchange Online
Connect-ExchangeOnline -Credential (Get-Credential) -ShowBanner:$False
#Get All Mailboxes
Get-EXOMailbox | Format-table UserPrincipalName,DisplayName
#Disconnect Exchange Online
Disconnect-ExchangeOnline -Confirm:$False
Conclusion
Connecting Exchange Online to PowerShell enables you to manage Exchange mailboxes quickly and conveniently. Additionally, you can use scripts to automate actions, changes, and adjustments for multiple accounts at a time, increasing operational efficiency.
Given that Microsoft doesn’t offer native backup tools for Exchange Online, Microsoft Teams, OneDrive, and SharePoint Online, make sure to use a dedicated backup solution to prevent data loss in the cloud. NAKIVO Backup & Replication is a universal data protection solution that allows you to send backups of Microsoft 365 data to different storage targets, including public clouds.