How to Install VMware Tools on Linux, Windows, MacOS, FreeBSD and Solaris
If you have ever deployed a VMware VM on VMware ESXi, VMware Workstation, VMware Player, or VMware Fusion, you’ve probably noticed that after installing a guest operating system (OS), you are asked to install VMware Tools. In this blog post, we cover what VMWare Tools is and the VMware Tools installation process on different operating systems including Linux, Windows, macOS, FreeBSD, and Solaris.
What Is VMware Tools?
VMware Tools is a set of drivers and utilities that are installed on a guest operating system (OS) and improve the performance of the guest OS. VMware Tools allows time synchronization between the host and guest and improves user experience by offering better mouse performance (no lagging), better graphics performance, a shared clipboard, the ability to drag & drop files, and scripting to automate tasks inside a VM.
As you may recall, when you create a VM, you should select the hardware version. Emulated hardware is used by VMs. Drivers for this emulated hardware are installed with VMware Tools. A VM can work without VMware Tools, but you’ll be missing most of the features and advantages of using VMs. It is highly recommended that you install VMware Tools on guest operating systems running on VMware virtual machines.
The set of features available after installing VMware Tools is not the same for different operating systems, for example, some features enabled for Windows guests are not available for Linux guests. The Unity mode is not available for Linux guests in the latest versions of VMware desktop hypervisors. Shared clipboard is limited for VMs running on ESXi hosts. You also need to install VMware Tools after P2V migration (if you convert a physical server to a virtual machine).
Requirements
There are some requirements to install VMware Tools:
- The guest OS must be on the list of supported operating systems.
- The VM must be in a running state to start the VMware Tools installation, and the guest OS must be booted.
In some Linux distributions, you may need to manually install the packages required for VMware Tools installation, such as kernel headers and tools that are needed to compile VMware Tools during installation). In Debian-based distributions, you can install the necessary packages with the command:
apt-get install binutils cpp gcc make psmisc linux-headers-$(uname -r)
In other Linux distributions, use the appropriate package managers such as zypper in SUSE and yum in Red Hat-based distributions.
How to Install VMware Tools on Linux
The algorithm for installing VMware Tools is similar for VMs running on VMware ESXi, VMware Workstation, VMware Player, and VMware Fusion. Let’s review how to install VMware Tools on a VM running Ubuntu 18. ESXi 6.5 and VMware Workstation 15 are used in our lab for writing this blog post. The workflow for newer versions of considered operating systems, VMware Workstation, and VMware Tools is similar.
The legacy method to install VMware Tools
This method involves inserting a virtual ISO disk image that contains the VMware Tools installer into a virtual DVD drive of the VM, running the executable file of the standalone installer, and installing VMware Tools. The legacy method can be useful when you need to install VMware Tools on older versions of Linux.
ISO images for different guest operating systems are stored in the following locations:
- On ESXi: /vmimages/tools-isoimages/
- On Windows, the default location is C:\Program Files (x86)\VMware\VMware Workstation
ISO images are stored in the installation directory of VMware Workstation on Windows.
- On Linux: /usr/lib/vmware/isoimages/
If ISO images with VMware Tools are missing on the machine running the VMware hypervisor, you can download the necessary ISO image with VMware Tools from VMware’s website:
- https://softwareupdate.vmware.com/cds/vmw-desktop/ws/17.5.2/23775571/windows/packages/
- https://softwareupdate.vmware.com/cds/vmw-desktop/ws/17.5.2/23775571/linux/packages/
- https://softwareupdate.vmware.com/cds/vmw-desktop/fusion/10.0.0/6665085/packages/
As Broadcom acquired VMware, you can also download VMware Tools from the Broadcom website after registering there:
https://support.broadcom.com/group/ecx/productdownloads?subfamily=VMware%20Tools
In order to install VMware Tools on Linux, do the following:
- Insert the virtual DVD image that contains the VMware Tools installer.
If your VM is running on VMware ESXi managed by vCenter, open VMware HTML5 vSphere Client and select your VM in Host and Clusters. If VMware Tools are not installed on that VM, you can see a notification and a clickable Install VMware Tools. You can also start VMware Tools installation manually by clicking Actions > Guest OS > Install VMware Tools (see the screenshot below).

After that, VMware vSphere Client notifies you that the VM with the guest OS must be running in order to mount the ISO image and install VMware Tools on the guest OS. If the guest OS is not running, you should start the VM first, wait until the guest OS is booted, and then mount the ISO image with VMware Tools installed. Click Mount when ready.

If your VM is running on VMware Workstation or on an ESXi host, but you manage a VM running on ESXi by using VMware Workstation, insert the VMware Tools installation ISO disk image.
- Select your running VM, on which VMware Tools must be installed.
- Click VM > Install VMware Tools.

NOTE: If you have two guest operating systems installed on a VM, you should install VMware Tools on both operating systems.
- Now the disk image containing VMware Tools installer is inserted into the virtual CD/DVD drive. In Ubuntu 18, the virtual DVD disc is mounted automatically, and you can see its shortcut on the Desktop. Right-click the shortcut and hit Open in Terminal.

NOTE: If the DVD disc is not mounted automatically on your Linux distribution, you can mount the disc manually.
- Go to the /mnt/ directory:
cd /mnt/ - Create the /mnt/cdrom/ directory if this directory doesn’t exist:
mkdir cdrom - Mount your CD-ROM to the /mnt/cdrom/ directory:
mount /dev/cdrom /mnt/cdrom - Go to the /tmp/ directory:
cd /tmp/ - Extract files from the VMware Tools installation archive (the number of your version may be different):
tar zxvf /mnt/cdrom/VMwareTools-10.1.0-4449150.tar.gz - Unmount the CD-ROM device:
umount /dev/cdrom
- Go to the /mnt/ directory:
- Make sure that the ifconfig command is available in the console. Otherwise, install net-tools that include the ifconfig tool manually before installing VMware Tools on your Ubuntu guest:
apt-get install net-tools - After opening the shortcut in Terminal, you can see a directory of the virtual DVD disc image that is the current directory in the console now. In our case, the content of the VMware Tools installation virtual DVD disc is available in /media/user1/VMware Tools/
Where user1 is the name of our user account in Linux.
You can list the content of this directory and see the archive with the VMware Tools installer for Linux.
cd /media/user1/VMware Tools/ls -alThe archive’s name is VMwareTools-10.1.0-4449150.tar.gz in this case.
Copy the archive to the directory for which you have write permissions, for example, to the ~/Downloads/ directory. As an alternative, you can use the /tmp/ directory:
cp VMwareTools-10.1.0-4449150.tar.gz ~/Downloads - Go to the directory to which you have copied the archive with VMware Tools:
cd ~/Downloads - Unpack the installer files from the archive:
tar -zxvf VMwareTools-10.1.0-4449150.tar.gz
- Go to the vmware-tools-distrib directory that contains the executable installer file:
cd vmware-tools-distrib/ - Run the installer file as root:
sudo ./vmware-install.pl
The installer is written on Perl. After running the VMware Tools installer, you should answer the questions in the console. Press Enter to use the default value shown in brackets. You can use the default value for the majority of options. Be attentive when you see the questions about enabling shared folders and drag & drop (see the screenshot below). Enter Y (yes) to enable those features, as the default answer is [no].

If VMware Tools is installed successfully, you will see a message as shown in the screenshot. You may need to restart your guest Linux to apply all system changes after installing VMware Tools.

- Once you have installed VMware Tools on Linux, you can check the version of VMware Tools installed with the command:
vmware-toolbox-cmd -vNOTE: In OpenSuSE Linux, you can download a fresh VMware Tools (Open VM Tools) installation package in the ymp format (YaST meta package) or directly download the binary packages in the rpm format from the OpenSUSE website.
Installing VMware Tools using software repositories (recommended)
VMware recommends that you install VMware Tools for Linux from online software repositories by using the Linux package manager. The advantage of this method is that you always get the latest version of VMware Tools. In addition, this installation process is faster and easier since you don’t need to copy installation files and perform manual configurations.
VMware has made open-source VMware Tools for Linux that are called Open VM Tools (you can find source code here). Let’s review how to install VMware Tools on Linux from online repositories on an example of Ubuntu 18. The clear installation of Ubuntu 18.04 is used to explain the process of installing VMware Tools (Open VM Tools) in each example.
NOTE: The installation principle for other Linux distributions is the same.
- Update the list of packages available in software repositories for your package manager.
apt-get update - If you use Linux without a graphical user interface (GUI) that has only the command line interface, then install VMware Tools with the command:
apt-get install open-vm-toolsIf you use Linux with the GUI, then install VMware Tools that are optimized for desktop experience and provide features such as Shared Folders, Shared Clipboard and Drag & Drop.
apt-get install open-vm-tools-desktopNOTE: There are also two alternative packages of Open VM Tools that can be installed from online software repositories.
open-vm-tools-develis an extended package of open-vm-tools that contains additional user space libraries for application development.open-vm-tools-debuginfois an alternative package with binaries and source code that can be used to debug open-vm-tools. - Now you can check the version of VMware Tools installed.
vmware-toolbox-cmd -v
Installing VMware Tools on Linux Automatically
VMware Tools can be installed automatically if you are installing Ubuntu 19 and newer. Even if you select Minimal installation in the Ubuntu installation wizard (Updates and other software), VMware Tools (open-vm-tools-desktop) will be downloaded and installed automatically from online software repositories (an internet connection is required). You may need to configure the drag-and-drop feature after that.
Thus, you can save time spent on installing VMware Tools and system updates. Ubuntu 19 becomes more user-friendly for a VMware virtual environment. If you have already installed Linux on a VM, use one of the methods explained above and install VMware Tools or Open VM Tools.
NOTE: If you install the latest versions of OpenSUSE Linux with an enabled internet connection and activate online repositories, Open VM Tools is installed automatically.
If you use VMware Easy Install to create a Linux VM, VMware Tools is installed automatically, but manual Linux installation with the “installing updates” option is preferable as you can configure more parameters in this case.

Drag and Drop Troubleshooting
If you run a Linux VM with installed VMware Tools on VMware Workstation/Player, and drag and drop doesn’t work, check the following settings when the VM is powered off:
Go to VM > Settings, select the Options tab, then select Guest Isolation. Make sure that these two options are enabled:
- Enable drag and drop
- Enable copy and paste

If these settings don’t help you and drag and drop still doesn’t work, try to run the commands in your guest Linux as shown below:
- Check the process related to VMware Tools (Open VM Tools are used in this example):
ps -ef | grep toolsRemember the process ID of the /usr/bin/vmtoolsd -n vmusr ––blockFd 3
In this example, the PID is 1891.
- List open files related to that process (1891):
lsof -p 1891 | grep -i plugins
- Enable the VMware vmblock fuse mount service required to use drag and drop.
systemctl enable run-vmblock\\x2dfuse.mount - Check the status of the service.
systemctl status -l run-vmblock\\x2dfuse.mount
Be aware that the drag-and-drop feature is disabled for VMs running on ESXi, but you can try to configure the shared clipboard feature as shown below.
How to Enable Shared Clipboard on ESXi VMs
By default, the shared clipboard is disabled on VMs running on ESXi hosts even if VMware Tools are installed. This is for security reasons. You can manually enable a shared clipboard for ESXi VMs. To do this, you should edit the virtual machine configuration. You can do it in the interface of VMware vSphere Client or manually by editing the VMX file of the VM in the datastore.
Let’s edit the VMX configuration file manually by using SSH access to the ESXi server on which our VM resides:
- Power off the VM which configuration you are going to edit.
- Connect to the ESXi host on which the VM is residing with an SSH client. SSH access must be enabled on your ESXi host. Go to the directory on the datastore where files of your Linux virtual machine are stored. In this example, we go to this directory:
cd /vmfs/volumes/SSD2/Ubuntu-VMT/ - In our case, we have to edit the Ubuntu-VMT.vmx that is located in the virtual machine directory. You can make a backup of the VM configuration file before editing. Add the following two strings at the end of the file:
isolation.tools.copy.disable = "FALSE"isolation.tools.paste.disable = "FALSE"
These settings override settings made with VMware Tools inside a VM.
The shared clipboard feature for ESXi VMs has certain limitations. For the copy/paste feature, 64 KB of plain text is the limit, and you cannot copy/paste images, audio, and other content copied to the clipboard or copy/paste files including text files.
How to Install VMware Tools on FreeBSD
The latest versions of VMware Tools are distributed only as Open VM Tools, which is an open-source implementation of VMware Tools. This is intended to improve the installation process and allow updating VMware Tools when updating the operating system.
With the latest FreeBSD versions (10.x and newer), it is recommended that you install Open VM Tools from online software repositories and not VMware Tools from standalone installers included in ISO images. The latest version of VMware Tools for FreeBSD to be distributed as an ISO image is 10.1.15. For this reason, only the modern method of installing VMware Tools (Open VM Tools) from repositories is explained in this blog post. Note that if you have VMware Tools installed from an ISO image and you want to install the latest version of Open VM Tools, you must first uninstall the old VMware Tools version before installing Open VM Tools.
Method 1: Using package manager
You can install VMware Tools on FreeBSD with the package manager.
- First, search the packets that are available for your system:
# pkg search open-vmIn our case, these two packets are available:
open-vm-tools-10.3.0_1,2 Open VMware tools for FreeBSD VMware guests
open-vm-tools-nox11-10.3.0_1,2 Open VMware tools for FreeBSD VMware guests

- As FreeBSD used in the current example doesn’t have the graphical user interface, the “nox” type of VMware Tools is installed:
# pkg install open-vm-tools-nox11-10.3.0_1,2The system notifies that some additional packages must be installed. Proceed with this action – type Y and press Enter to continue.

You get a message that the fuse kernel module must be installed to use fusefs-libs.

This kernel module can be installed with the commands:
Install the port:
cd /usr/ports/sysutils/fusefs-libs3/ && make install cleanInstall the package:
pkg install fusefs-libs3 - After installing VMware Tools (Open VM Tools), reboot the VM running FreeBSD:
shutdown -r now
Method 2: Installing VMware Tools from ports
You can also install VMware Tools on FreeBSD from ports. To do that:
- Go to the ports directory:
cd /usr/ports/emulators/open-vm-tools - Install Open VM Tools:
make install cleanrehash - Reboot the VM running FreeBSD:
shutdown -r nowNOTE: If you are using FreeBSD without the X Window System (without a GUI), at step 1, go to the directory:
cd /usr/ports/emulators/open-vm-tools-nox11
How to Install VMware Tools on Solaris
Oracle Solaris (also known as SunOS) is another operating system supported by VMware as a guest operating system. Like the operating systems covered above, it is highly recommended that you install VMware Tools on Solaris. The process of installing VMware Tools on Solaris is similar to installing VMware Tools on Linux and FreeBSD from the ISO installation disk image.
Let’s look at how to install VMware Tools on Solaris 11.4:
- Mount the ISO image with the VMware Tools installer to the VM running Solaris as shown for Linux VMs above. If the image cannot be mounted automatically, download the installer from the VMware or Broadcom website and mount the installation ISO image for Solaris to the VM manually.
Wait a moment for the auto-mounting of the image to the CD-ROM in the guest operating system.
- Once you have mounted the ISO image to the virtual CD/DVD drive of the VM, view the files on that disc.
ls -al /cdromNOTE: If the CD-ROM is not mounted under /cdrom/vmwaretools/, try to restart the volume manager:
/etc/init.d/volmgt stop
/etc/init.d/volmgt start
- Copy the archive with the VMware Tools installer to the temporary directory, for example, to /tmp/
cp /cdrom/vmwaretools/vmware-solaris-tools.tar.gz /tmp - Go to the /tmp/ directory:
cd /tmp
- Unzip the files from the archive:
gunzip vmware-solaris-tools.tar.gz - Untar files:
tar xvf vmware-solaris-tools.tar - Check that files have been extracted:
ls -alAs you can see, the files are extracted to the vmware-tools-distrib subdirectory.
- Go to that subdirectory:
cd vmware-tools-distrib/Now you are in the /tmp/vmware-tools-distrib/ directory.
- Run the vmware-install.pl file to run the installer and install VMware Tools on Solaris.
./vmware-install.plNOTE: The VMware Tools installer is written on Perl. Perl must be installed in your operating system to successfully run the installer.

- Answer the questions provided by the VMware Tools installer. You can use default settings in most cases. Pay close attention to questions about the VMware Host-Guest Filesystem and vmblock to enable the shared folders, shared clipboard, drag-and-drop features.

- Reboot your Solaris VM to make changes take effect.
init 6 - Check the status of VMware Tools after rebooting.
/etc/init.d/vmware-tools status
If everything is OK, the output should look like this:
vmtoolsd is running
How to Install VMware Tools on Windows
To install VMware Tools on Windows, do the following:
- Insert a virtual ISO disk image that contains the VMware Tools installer into the virtual DVD drive of a VM. In the current example, Windows Server 2008 R2 (x64) is running on the VM on which VMware Tools will be installed.
- If your VM is running on an ESXi host and you use vCenter to manage ESXi hosts, open VMware vSphere Client, select your VM in the Hosts and Clusters menu, then click Actions > Guest OS > Install VMware Tools.

As you recall, ISO images with VMware Tools installers are located on an ESXi host in the /vmimages/tools-isoimages/ directory. If ISO images are missing on your ESXi host, you can download and install VMware Tools Offline VIB Bundle on your ESXi host. This bundle contains a new release of VMware Tools for supported guest operating systems. You can also copy ISO images from your local computer to that directory on the ESXi host by using an SCP client manually.
If you use VMware Workstation, for managing a VM running on your local machine or on a remote ESXi host, click VM > Install VMware Tools.

After that, the virtual ISO disk image containing the VMware Tools installer is mounted to a guest operating system. By default, the VMware Tools installation ISO images are located in the directory where VMware Workstation is installed. In our case, this directory on a Windows computer is: C:\Program Files (x86)\VMware\VMware Workstation
The names of ISO files are:
windows.iso – the image for the latest Windows versions since Vista
winPre2k.iso – the image for old Windows versions released before Windows 2000
winPreVista.iso – the image for Windows versions older than Windows Vista (Windows 2000, 2000 Server, XP, XP x64)
If, for some reason, these ISO images are missing, you can download the VMware Tools installer for Windows from the VMware’s web site.
- If autorun is enabled on the guest Windows system, you will see the AutoPlay window with a suggestion to run setup64.exe (because a 64-bit version of Windows is used as a guest OS).
If autorun is disabled, open the optical disc drive in which the virtual ISO disk image is inserted in your Windows guest, then select the appropriate installer file: setup.exe for 32-bit operating systems or setup64.exe for 64-bit operating systems. Run the installer as Administrator.

- The VMware Tools Setup wizard opens.
- On the first screen, read the introduction. Click Next to continue.
- Choose Setup Type. Typical is enough in most cases. You can select this type and continue with the installation.

- Ready to Install. If you want to change the installation type, hit Back. If everything is correct, hit Install to start the installation process. Wait for a while until VMware Tools are installed.
- Completed the VMware Tools Setup Wizard. If VMware Tools have been installed successfully, you should see this screen. Hit Finish to close the window.
- Once you have installed VMware Tools on your Windows guest, you must restart your system for the configuration changes made to VMware Tools to take effect. In the displayed window click Yes to restart now.
Now you can use features that became available after installing VMware Tools.
Install VMware Tools on Windows Server Core in PowerShell
If you use Windows Server Core which has only the command line interface and doesn’t have the graphical user interface, the principle of VMware Tools installation is similar. You can run the VMware Tools installer in PowerShell.
- Insert the virtual ISO disk image that contains the VMware Tools installer into a virtual DVD-ROM of the VM.
VM > Install VMware Tools
- In PowerShell, run the command to see the letter of the optical drive assigned in your Windows running on the VM.
Get-Psdrive - Go to that drive (in this example D: is the optical drive used by the Windows VM):
d:
- Run the installer:
.\setup64.exe
- Follow the steps of the installation wizard to complete VMware Tools installation.
- Restart your Windows VM
shutdown -r -t 0
How to Install VMware Tools on MacOS
MacOS can be installed on VMs running on VMware Workstation/Player, VMware Fusion, and VMware ESXi. Installing macOS on VMware ESXi and Workstation needs some fine-tuning. Installing VMware Tools on macOS is different from installing VMware Tools on other operating systems, but you must have the ISO image with the VMware Tools installer and mount the ISO image to a virtual DVD drive of the VM as a DVD disc. Let’s look at how to install VMware Tools on macOS Mojave (Mac OS X 10.14):
- Download the archive that contains the needed darwin ISO image. Select VMware Tools packages for Solaris and OS X. You can download a zip or tar.gz archive. At the time of writing this post, the newest VMware Tools release is VMware Tools 10.3.2.
- Extract the archive. You need the darwin.iso file. You can copy darwin.iso to the directory where other ISO images with VMware Tools are stored. If you use VMware Workstation, this directory is the VMware Workstation installation directory on Windows and /usr/lib/vmware/isoimages/ on Linux (Ubuntu). The directory to store ISO images with VMware Tools on ESXi is /vmimages/tools-isoimages/
- Mount the ISO image with VMware Tools to the virtual DVD drive of the VM. If the VMware Tools image is copied to the standard VMware Tools directory and you manage the VM in VMware Workstation, you can click VM > Install VMware Tools when a VM is running. Don’t forget to eject the disc used before from the virtual DVD drive, for example, the macOS installation medium.

However, you can always mount the ISO image with VMware Tools manually in the VM settings when the VM is powered off.

- Now you can see the icon of DVD-ROM with the VMware Tools disc inserted in a running macOS. By default, autorun is enabled, and you should see two options in the opened window – Install VMware Tools and Uninstall VMware Tools. Hit Install VMware Tools.

- The Installation VMware Tools wizard for macOS opens.
Introduction. Read the information and click Next to continue.
Destination select. If there are multiple macOS users in the guest operating system, you can opt to install VMware Tools for all users or only for you (the current user).
Installation Type. At this step, you can change the install location if need be. When all settings are configured, hit the Install button. In the popup notification window, click Continue Installation and enter your login and password to install the software.

Installation. Wait for a while until all necessary packages are installed.
After unpacking VMware Tools files, you will see the System Extension Blocked warning in the popup window of macOS Mojave. Click Open Security Preferences and edit settings – do NOT click OK.

The Security & Privacy window now opens. In the General tab, you can see this notification: System software from developer “VMware, Inc.” was blocked from loading.
Click the Allow button to unblock VMware Tools in macOS. After that, you can close the window.

If a popup system extension warning message is displayed, click OK.
Summary. In the Install VMware Tools wizard, you can now see that the installation has been successful. Hit the Restart button and restart the virtual machine running macOS.

- Once macOS has been rebooted, a new pop-up window opens, and a notification is displayed: System Extension Blocked. You should recall seeing the same notification during the process of installing VMware Tools. Click Open Security Preferences, as you have done before.

The notification in the Security & Privacy window is also the same: System software from developer “VMware, Inc.” was blocked from loading. Click Allow to unblock VMware extensions.
Click OK if the System Extension Warning message is displayed.
Now you can verify whether features related to VMware Tools are working properly. Try to copy and paste the text, drag and drop files, and enter full-screen mode. Note that there may be limitations to drag and drop files if your VM with macOS is running on an ESXi host.
- Once you try to drag and drop files from your host machine on which a VMware Workstation, VMware Player, or VMware Fusion is installed, you will see the accessibility access warning: “vmware-tools-daemon” would like to control this computer using accessibility features. Hit the Open System Preferences button to edit settings.
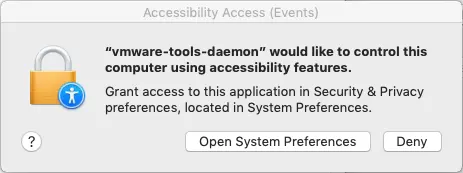
The Security & Privacy window opens again, but you see the Privacy tab now. You need to select the checkbox for vmware-tools-daemon string, but now this string is inactive. In the left bottom corner of the window, click the lock to make changes.
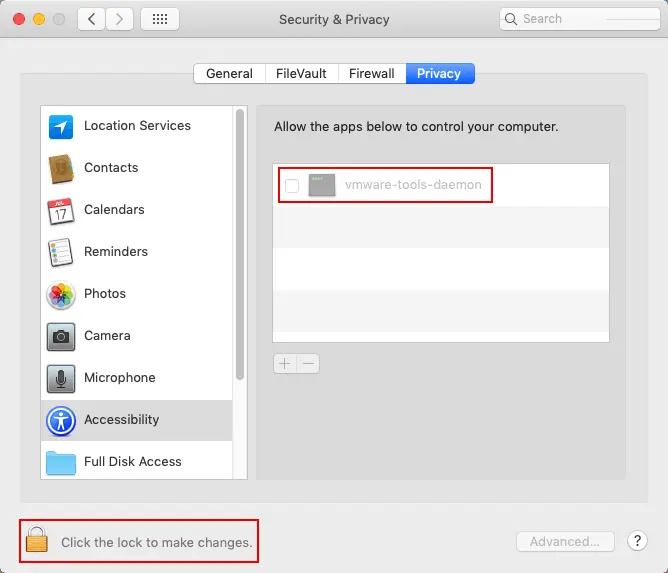
Enter your login and password to confirm. Now the settings are editable. Select the vmware-tools-daemon checkbox.

Now everything should be OK, and the features that rely on VMware Tools should work on your guest macOS. If the advanced features you require after installing VMware Tools don’t work on your macOS VM, try to reinstall VMware Tools.
Conclusion
The principle of installing VMware Tools is quite similar on Linux, Free BSD and Solaris. Moreover, you can install Open VM Tools, which is an open-source implementation of VMware Tools, on Linux and FreeBSD from online repositories with a package manager available in your operating system.
VMware Tools should be installed on a VM to take snapshots of the running VM, quiesce the file system in the VM to make the state of the VM suitable for backups, and keep the VM data consistent. VM snapshots are also used to perform incremental backup and replication of VMs. NAKIVO Backup & Replication is an all-in-one data protection solution that leverages VMware APIs and native features to allow the creation of incremental backups and replicas of VMware vSphere VMs at the host level.