VMware Remote Console: How to Install on Windows and Linux
VMware provides several ways to manage virtual machines and guest operating systems running on the VMs. In newer vSphere versions, you can use a web interface with VMware Web Console (starting from vSphere 5.1) or install a standalone VMware Remote Console application. In this blog post, we explain what VMware Remote Console is and how to launch VMware Remote Console to configure VM options as well as manage guest operating systems in vSphere.
What Is VMware Console?
VMware Web Console is the default option for managing vSphere guest operating systems on VMs in vSphere 6.x, vSphere 7.0, and vSphere 8.0. Another option is installing VMware Remote Console on your computer. In these versions, you use the HTML 5 vSphere Client and VMware Host Client, which provide a web interface, to open both consoles.
Users of earlier vSphere versions such as vSphere 4.x and vSphere 5.x are familiar with the standalone VMware vSphere Client application (written in C#) used to manage ESXi hosts and VMs. The C# vSphere Client for Windows had the option to manage a guest operating system (OS) in the client window.
Don’t confuse VMware console, which is a tool to manage guests in the GUI, with the command line (console) interfaces such as ESXCLI and Power CLI. The VMware console displays the user interface of a guest OS similarly to how you see the interface of the host OS on a physical monitor connected to your computer. We will cover VMware Web Console in brief before going into a detailed explanation of VMware Remote Console.
VMware Web Console
The HTML5 versions of VMware vSphere Client and VMware Host Client allow you to open VMware Web Console in a web interface to manage a guest OS of a running VM without installing additional applications (see the screenshot below). In VMware Host Client, you can open Web Console as a window in the same tab or in a new tab.

In VMware vSphere Client, VMware Web Console always opens in a new tab in the web browser. In the screenshot below, you can see the interface of the NAKIVO Backup & Replication virtual appliance in the VMware Web Console opened from VMware vSphere Client in a new tab in the web browser. The NAKIVO Backup & Replication virtual appliance is a preconfigured VMware vSphere VM with selected installed components of NAKIVO’s data protection solution.

What Is VMware Remote Console
VMware Remote Console (VMRC) is a standalone application that you can install on computers running Linux, Windows, and macOS to manage VMware vSphere VMs and guest operating systems running on these VMs. VMRC is the alternative to VMware Web Console for guest management and provides better performance and stability. You can use VMware Workstation (or VMware Fusion Pro on macOS) as a replacement for VMware Remote Console, but the advantage of VMware Remote Console is that you don’t need to buy a license. VMware Remote Console is not pre-installed and should be installed manually.
VMRC features
VMware Remote Console provides remote access to a guest OS and VM devices and allows you to edit VM settings. You can add virtual processors, memory, virtual disks, virtual floppy drives, CD/DVD drives, insert ISO images into CD/DVD drives, manage virtual network adapters, etc. You can change existing settings and change a virtual machine’s name.
Using VMRC, you can connect a removable USB device, such as a USB flash drive or a USB HDD attached to your local machine, to a remote VM running on an ESXi host. This functionality is available via the USB passthrough feature.
Other VMRC features include:
- VMware Remote Console supports proxy in a network configuration for connecting to an ESXi host and VMs.
- You can initiate installing VMware Tools from VMware Remote Console.
- VMRC can fit the screen resolution of a guest OS when you change the resolution of the VMware Remote Console Window.
- VMRC is a free application.
How to Download VMware Remote Console
After Broadcom acquired VMware in 2024, the steps to download VMware Remote Console were changed. Follow these steps to download VMRC from the official website:
- Go to the VMware download page on the Broadcom website. You must register on this website to proceed.
- Click Drivers & Tools at the top of the page.
- Filter the needed items by typing “console” to find the standalone VMware Remote Console Client.
- Download VMRC for the needed platform and install the application on a computer.
The alternative link to download VMRC is https://softwareupdate.vmware.com/cds/vmw-desktop/vmrc/12.0.5/22744838/
The VMware Remote Console installer for Windows is provided as a ZIP archive that contains an EXE file. VMRC for Linux is provided as a .bundle installation file. In our example, we download the installer files of VMRC version 12. This post is focused on installing and configuring VMRC on Linux and Windows. macOS users should visit the Apple Store to get the VMware Remote Console.
Installing VMRC on Linux
Let’s go over how to install VMware Remote Console on Ubuntu Linux:
- The VMRC application depends on the libaio1 package on Ubuntu. If the required package is missing, you can install libaio1 with the following command (you need root privileges):
sudo apt-get install libaio1 - Go to the directory to which you saved the downloaded bundle file of the VMware Remote Console installer.
Edit the permissions to allow executing the bundle file. The operations explained in this tutorial require root privileges (the version number may be different in your case).
sudo chmod +x ./VMware-Remote-Console-12.0.0-17287072.x86_64.bundleNOTE: VMRC is not available in Linux software repositories. For this reason, you need to install VMRC by using the downloaded installation bundle.

- After setting the permissions, run the VMRC installer:
sudo ./VMware-Remote-Console-12.0.0-17287072.x86_64.bundleThe graphical user interface of VMware Remote Console Installer opens in a new window. You should see the installation wizard.
- In the VMware Remote Console Installer wizard, complete all the steps:
- On the Welcome to the VMware Remote Console installer screen, select I accept the terms in the license agreement. Click Next on each screen to continue.

- Hit Yes or No depending on whether you would like to check product updates on startup. We select No because we don’t want to install updates automatically.
- Click Yes or No depending on whether you want to join the VMware Customer Experience Improvement Program (CEIP) and send statistics to VMware. We select No in this walkthrough.
- The product is ready to be installed. Click Install.
Wait for the installation process to complete.
- On the Welcome to the VMware Remote Console installer screen, select I accept the terms in the license agreement. Click Next on each screen to continue.
If you see Installation was successful, you can close the window of the VMRC installer.
How to Launch VMware Remote Console in Linux
Even though you can find the VMware Remote Console item in the search panel after clicking the Start button in the Ubuntu GUI, you cannot launch VMware Remote Console directly. You need to click the link in VMware vSphere Client or VMware Host Client and open this link in VMware Remote Console.
Let’s go over how to launch VMRC in Linux to manage a VM running on an ESXi host. In this example, we use VMware Host Client to access the ESXi host.
- Enter the IP address of the ESXi host in a web browser and log in to VMware Host Client.
- In the Navigator pane, click Virtual Machines and select the needed VM.

- Click the Monitor icon to open the menu with the VMware Console options to manage this VM’s guest operating system. A menu with multiple VMware Console options appears.
- The first three options are used to open VMware Web Console in the web browser.
- The Launch remote console option is used to open the interface of a guest OS in the VMware Remote Console Application you have previously installed on your computer.
- The Download VMRC option is used to get the VMRC download link and install VMware Remote Console.
- Click Launch remote console.

Once you click Launch remote console, a pop-up pane is displayed under the address bar in the web browser. You need to select an application to open the VMRC link.
- Click Choose Application. You can select the checkbox to always allow your ESXi host to open VMRC links for this IP address.

- Choose an application to open the VMRC link. If you have installed only VMware Remote Console on your computer, this application is selected by default. If you have VMware Workstation on your computer, VMware Workstation is selected by default.
You can click Choose and select the needed application. You cannot install VMware Remote Console and VMware Workstation on the same Linux machine because they share certain components required for their operation.
- After selecting VMware Remote Console, click Open Link.

- A certificate warning is displayed. Click Connect Anyway to continue. Select the Always trust this host with this certificate checkbox to skip this message in the future when connecting to VMs on this ESXi host.

Now you are connected to the user interface of the guest OS of the selected VM running on the ESXi host.

You can connect to multiple VMs and launch multiple instances of VMware Remote Console.
Installing VMRC in Windows
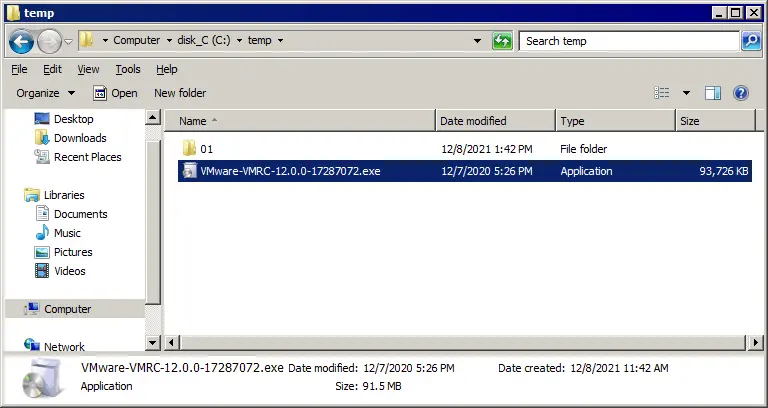
In this example, we are going to install VMware Remote Console 12.0 0 for Windows. To install VMware Remote Console for Windows, we unpack a ZIP archive downloaded before and extract the installer EXE file. In our case, the file name is VMware-VMRC-12.0.0-17287072.exe and we launch the EXE file.
The VMware Remote Console Setup wizard starts in a new window. Follow the steps of the wizard:
- The first step of the wizard is the welcome screen. There is nothing to configure on this screen. Click Next at each step to continue.

- Read and accept the End-User License Agreement.
- Select the installation destination and any additional features.
Click Change and select a directory to install the application if you don’t want to use the default installation path.

- Select User Experience settings. You can deselect the checkboxes if you don’t want to enable automatic updates and send additional information to VMware:
- Check for product updates at startup
- Join the VMware Customer Experience Improvement Program
We select No for both of these options.
- Ready to install. Hit Install to begin the installation.
Wait until the wizard installs VMware Remote Console on your computer.
- Once installation is completed, click Finish to close the installer window.
- You must restart your operating system. Click Yes to restart now or click No if you want to manually restart later.
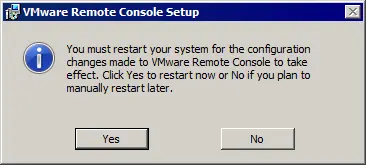
After the system reboot. you can launch VMware Remote Console.
Installing VMRC with Chocolatey
There is an alternative method for installing VMware Remote Console on new Windows versions like Windows 10, Windows Server 2016, Windows Server 2019, and Windows Server 2022. You can use Chocolatey, a software management automation tool in Windows. Chocolatey is used in PowerShell to install applications from online software repositories for Windows. The advantage of this method of installing VMware Remote Console is that you don’t need to register on the VMware or Broadcom website to download the VMRC installer.
Install Chocolatey if this software manager for Windows is not installed on your machine. Download and run this PowerShell script to install Chocolatey:
https://community.chocolatey.org/install.ps1
If the script doesn’t run, set the execution policy by running this command:
Set-ExecutionPolicy Bypass -Scope Process -Force; [System.Net.ServicePointManager]::SecurityProtocol = [System.Net.ServicePointManager]::SecurityProtocol -bor 3072; iex ((New-Object System.Net.WebClient).DownloadString('https://community.chocolatey.org/install.ps1'))
Use the command without the version definition to install the latest available version of VMRC:
choco install vmrc
Run the command to install a specific version, for example, VMware Remote Console 12.0 0 for Windows from software repositories with Chocolatey:
choco install vmrc --version=12.0.0.17287072
This command downloads and installs the needed software packages for the defined VMRC version. Your version number may be different.
Press Y (yes) or A (Yes to all) when prompted to install the package and to continue.

If you see a failure related to the VMRC package, try to run the command once again.
choco install vmrc --version=12.0.0.17287072

When the command execution is completed, the number of installed packages is displayed in PowerShell. If you see The install of vmrc was successful, you can close this PowerShell console window and use VMware Remote Console.
How to Use VMware Remote Console in Windows
Let’s go over how to use VMware Remote Console in Windows if you connect to vCenter in VMware vSphere Client for vSphere management:
- Open the IP address of your vCenter Server in a web browser, open VMware vSphere Client, and log in. Go to Host and Clusters and select the needed virtual machine in the inventory.
- When the VM is selected, you can see the preview screen of the guest OS user interface. Under this preview screen, you should see two links. Click Launch Remote Console to connect to the VM in VMware Remote Console installed in your Windows system.
NOTE: If you haven’t installed VMRC yet, you can click a link to the download page of the VMware website or use Web Console in a web browser. If you’re not using the latest VMware ESXi or vCenter version, the link won’t take you to the right page. In this case, use this link to the downloading page on the Broadcom website.

- The Allow this site to open the vmrc link? dialog pane appears under the address bar in your web browser. Click Choose Application.

- If the path to VMware Remote Console is displayed, then VMRC is selected. If VMRC is not selected, click Choose other Application and select the VMRC EXE file manually.
- Click Open Link.

VMRC should open and connect to the VM now.
- You can set VMware Remote Console to be used by default in VMware vSphere Client. Click your account name in the top right corner of the web interface and hit My Preferences.

- Click the Default Console tab and select VMware Remote Console (VMRC). Click Save to save settings and close this dialog.

VMRC Interface and Options
After you launch VMware Remote Console by using the VMRC link, a new VMRC window opens, and you should see the guest OS user interface in this window.
In the top left corner, you can see the VMRC menu, the shortcut menu to change the VM state (Power On, Shut Down Guest, Suspend Guest, and Restart Guest), the button to send the Ctrl+Alt+Del combination to the guest OS, and the button to enable the full-screen mode. These additional menus and buttons duplicate some options of the VMRC menu.
In the top right corner of the VMRC window, you can expand a panel and see icons of virtual devices such as virtual hard disks, CD/DVD-ROM drives, and network adapters. Right-click the device icon to open device settings in the VM settings window.
You can change the VMRC window size, and the size of the guest OS GUI can adjust to the changed VMRC window size (VMware Tools must be installed in the guest OS).

Options in the VMRC menu
Power. This submenu contains options to change the VM power state. If you shut down the VM, the VMRC window doesn’t close. The black background in the window is displayed with the “Waiting for connection” string.
Removable devices. You can use this submenu to quickly connect/disconnect virtual devices, including virtual CD/DVD drives, network adapters, and USB devices attached to your local machine on which VMware Remote Console is installed. In order to connect a removable device, go to VMRC > Removable Devices > Device_Name > Connect. In order to disconnect the device, go to the same menu and click Disconnect.
Send Ctrl+Alt+Del. If you press Ctrl+Alt+Del on your local machine, your host operating system on the local machine reacts to this combination. This menu entry allows you to send the Ctrl+Alt+Del combination directly to the guest OS without any impact on the host OS. As an alternative to this menu entry, you can press the Ctrl+Alt+Insert combination.
Manage. See a detailed description of this entry below.
Full Screen. Opens VMware Remote Console in full-screen mode.
Preferences. Opens the Preferences window, which is covered below.
Help. Displays the help information.
Exit. Can be used to close the VMRC window and provides the same result as clicking the x button in the top right corner of the window.

The Manage menu
The Manage menu allows you to install or update VMware Tools for the guest OS, display the message log, and edit virtual machine settings.

The Virtual machine settings window of VMRC is similar to the VM settings window of VMware Workstation. The window contains two tabs: Hardware and Settings.

If you upgrade the guest OS, you can change the guest operating system in the Options tab to optimize VM performance. A VM must be powered off to change the guest OS in VM settings. Once you change the guest operating system in VM settings, the changes are written to the VM’s VMX file.

The Preferences window
The Preferences option in the VMRC menu opens the Preferences window that contains the main settings of the VMware Remote Console. You can also open the Preferences window by going to vmrc://settings in your web browser on the local machine where VMRC is installed.
Software Updates. You can change automatic update settings and configure connection settings by selecting a proxy server for an internet connection.
Display behaviors. There are two options for how the guest OS interface reacts to changing the VMRC window size:
- Resize the virtual machine and the window. The resolution of the VM display is resized to fit the window.
- Stretch the virtual machine in the window. The VM display resolution is not changed, and the VM display is stretched to fit the window.
Connection Proxy for Remote Virtual Machine. You can enter the settings of the proxy server if the proxy server is required in your network.
Graphics. Hardware acceleration can improve performance but is disabled by default to avoid issues if an unstable graphic card is used.
Customer Experience Improvement Program. If you need to change CEIP settings during VMRC installation, you can do it here by selecting/deselecting the checkbox.

Other VMRC Configuration Parameters
Log file location. VMRC logs in Windows are located in the %LOCALAPPDATA%\temp\vmware-%USERNAME% folder.
VMRC logs in Linux are stored in %TEMP%/vmware-%USERNAME%/
The USB Arbitrator log is stored in /tmp/vmware-root/
Using VMware Workstation and VMRC in Windows. If you install VMware Workstation on your host Windows OS after installing VMware Remote Console, VMware Workstation can be set as the default application to open VMRC links when opening them from a web browser. If you need to use VMware Remote Console by default, check the registry values. You can do this operation in PowerShell:
Get-Item "HKLM:\SOFTWARE\Classes\vmrc\DefaultIcon"
Get-Item "HKLM:\SOFTWARE\Classes\vmrc\shell\open\command"
In order to change settings and use VMRC by default, write these values to the registry:
Set-Item HKLM:\SOFTWARE\Classes\vmrc\DefaultIcon -Value '"C:\Program Files (x86)\VMware\VMware Remote Console\vmrc.exe",0'
Set-Item HKLM:\SOFTWARE\Classes\vmrc\shell\open\command -Value '"C:\Program Files (x86)\VMware\VMware Remote Console\vmrc.exe" "%1"'
How to Exit VMware Remote Console
Press Ctrl+Alt to leave the guest screen of the console window. Pressing Ctrl+Alt transfers mouse and keyboard input from the VM to the local machine. This combination is extremely useful if VMware Tools is not installed on the guest OS during the boot process of the guest OS (when VMware Tools have not been loaded yet) and if the guest OS doesn’t have a graphical user interface. If you close the VMRC window, the VM is not shut down.
Finally, let’s explore how to uninstall VMRC from Linux and Windows.
Uninstalling VMRC in Linux
If you need to uninstall VMware Remote Console (for example, you want to install VMware Workstation), you can do this in the Linux terminal. Display the list of all VMware applications installed on the Linux machine:
vmware-installer -l
The command to uninstall VMRC is:
vmware-installer --uninstall-product vmware-vmrc
If you have issues when trying to uninstall VMRC, you can perform the following actions. Open the /etc/vmware-installer/database file in DB Explorer for SQLite. Locate the component_dependencies table. Delete the row that contains vmware-usbarbitrator>=17.1.1.
Uninstalling VMRC in Windows
Go to Control Panel > Programs and features, select VMware Remote Console in the list of installed applications and click Uninstall.
If you used Chocolatey to install VMRC, use this command to uninstall this application:
choco uninstall vmrc
Conclusion
VMware Remote Console is a useful application to manage virtual machines and guest operating systems in VMware vSphere. This blog post has explained how to install VMware Remote Console 12.0 0 for Windows and Linux and how to use VMware Remote Console as well as covered VMRC configuration. VMware VMRC is a free lightweight multi-platform tool that is not difficult to use. Download VMware VCP Study Guide to learn more about VMware vSphere features.
You should also use a dedicated backup solution to protect your VMware vSphere VMs. NAKIVO Backup & Replication is a comprehensive backup and disaster recovery solution that leverages native VMware tools for optimal efficiency and speed.