How to Set Up Immutable Backup on NAS with NAKIVO
Immutable data storage is one of the most reliable anti-ransomware protection approaches for storing backups, especially at a time when ransomware is increasingly used to compromise backup data.
Network-attached storage (NAS) devices are convenient for storing both production and backup data. However, the integrity of this data can be compromised by ransomware, or it can be modified or deleted by unauthorized malicious actors.
Configuring data immutability on NAS to make backups immutable is key to a reliable data protection strategy and strengthens the 3-2-1 backup approach. This blog post explains how to configure immutable backup storage on NAS with NAKIVO Backup & Replication.
Preparing Your NAS for Storing Backups with NAKIVO
NAKIVO Backup & Replication is a universal data protection solution that can be installed on NAS devices from different vendors to create a powerful backup appliance. You can also use a NAS device as a backup repository and enable backup immutability.
To proceed with an installation on NAS, ensure that the model of your NAS device is supported for a NAKIVO Backup & Replication deployment. You can find the full list of supported Synology, QNAP, ASUSTOR, NETGEAR and Western Digital NAS device models on the Installation Requirements page.
You should also check the backup immutability requirements:
- The file system on backup storage must support extended attributes modified using the
chattrandsetfattrcommands. - The backup repository type on the assigned Transporter must be set to Local Folder.
- The backup repository must be configured to Store backups in separate files option selected.
Selecting the Right NAS Configuration
NAKIVO Backup & Replication has three components: Director, Transporter, and Backup Repository. The Transporter component is responsible for data transfers and data processing, including the operations of writing data to backup repositories. A Transporter must be installed on the NAS to create immutable backups.
The configuration of NAKIVO Backup & Replication to store backups on NAS can be done in two main ways:
- Installing NAKIVO Backup & Replication as the Full Solution, that is the Director and the Onboard Transporter on NAS.
- Installing only the Transporter on NAS with the full solution installed on another supported server, VM, or device. Then, the Transporter on NAS is connected to the Director of the Full Solution instance.
In this blog post, we will explain how to configure NAKIVO Backup & Replication and an immutable data backup on a QNAP NAS.
Installing NAKIVO Backup & Replication
Follow the workflow below to install and configure the required NAKIVO components on a QNAP NAS:
- Log in to the web interface of QNAP NAS. The address is http://10.17.193.82:8080 in our case.
- Click the App Center icon.

- Refresh the AppCenter page and type NAKIVO in the search bar to check available NAKIVO components to install (see the screenshot below).
The search results should display NAKIVO Backup & Replication as a full solution and the NAKIVO Transporter. The status of the application is also displayed: if an application is not installed, the Install button is available.

- As we already have NAKIVO Backup & Replication Full Solution installed, we will install the Transporter only on this QNAP NAS. The ability to add Transporters in your data protection infrastructure allows for flexible and efficient scalability.
We select NAKIVO Transporter and click Install.
- Read the notification message and hit Yes, I agree.

- Wait until the NAKIVO Transporter is downloaded and installed.
Adding the Transporter
You need to add the Transporter configured on the NAS to use the immutability feature. This means that we need to add the Transporter that we just installed on the NAS to the main instance of NAKIVO Backup & Replication.
NOTE: If you have installed NAKIVO Backup & Replication Full Solution (Director and Onboard Transporter) on your NAS, you can skip the steps for adding the Transporter as the Onboard Transporter is already installed on the NAS.
To add a Transporter, follow the steps below:
- Open the web interface of NAKIVO Backup & Replication (the Full Solution with the Director).
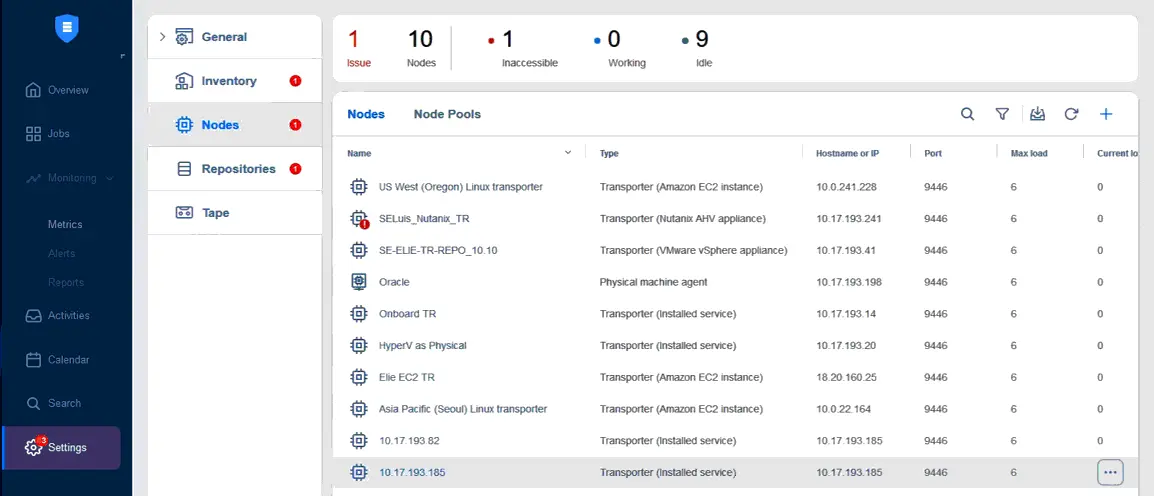
- Go to Settings > Nodes and click + to add the Transporter to the NAKIVO solution configuration and click Installed Service.

- Enter the parameters to add the Transporter to the NAKIVO configuration:
Hostname or IP: Enter the IP address of your NAS where the Transporter is installed.
Master password: Enter the master password if used (optional).
- Click Connect.
- In the Certificate Details window, hit Accept.
- Once you see the Certificate accepted notification message, hit Add.

- The Transporter installed on NAS has been added to the list of nodes on the main NAKIVO instance.
NOTE: If you have the Full Solution installed, then the Onboard Transporter is already available on the NAS.
Preparing backup storage
At this stage, you should prepare a directory on the NAS that will be used as a backup repository for immutable backups.
NOTE: Creating a share adds potential security risks. Below is the process for share creation, but you don’t have to create a share. You can use any directory.
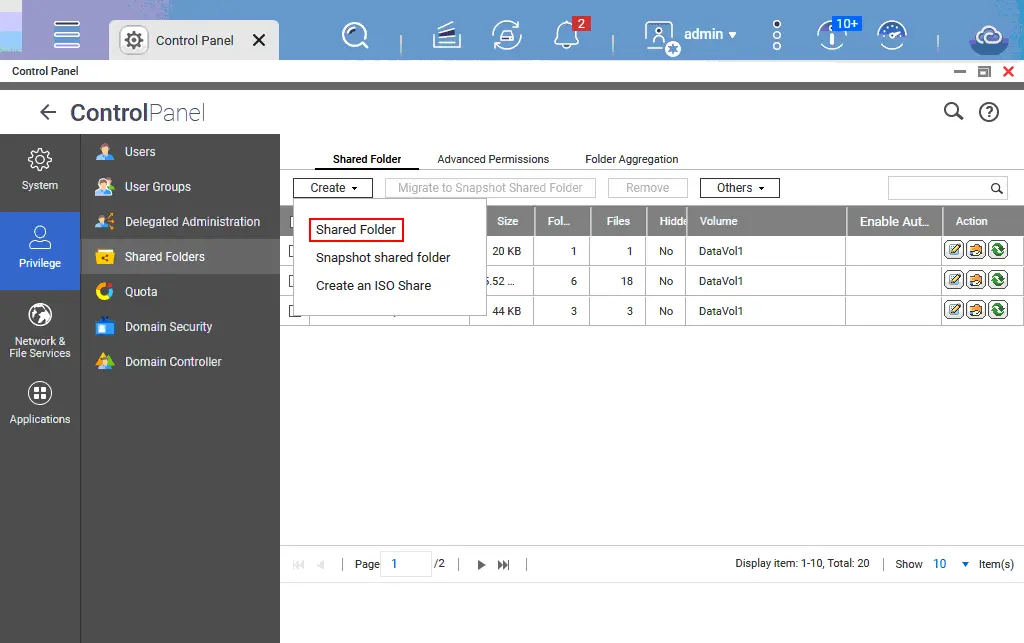
- Open the web interface of QNAP NAS again and then open the Control Panel.

- Go to Shared Folders.

- In the Shared Folder tab of the Control Panel window, click Create > Shared Folder.
- Enter the folder name, for example, backup. Hit Next to continue.

- Provide full access for administrators. Select the RW (read+write) checkboxes for the needed usernames.

- Check the folder properties and hit Finish.

- Connect to the QNAP NAS in an SSH client. You can use PuTTY in Windows. SSH access must be enabled on QNAP NAS for this purpose.
- Go to /share/CACHEDEV1_DATA:
cd /share/CACHEDEV1_DATA - List the content of this directory with the
llcommand (ls -al). Make sure that the backup directory we have previously created exists (the folder name is backup).
- Go to the backup directory:
cd backup - Display the full directory path and copy this path:
pwdThe path is /share/CACHEDEV1_DATA/backup in our case.
If you use Synology NAS, connect to the NAS via SSH and run the command to find your folder:
find / -name "your_folder_name"
The output should be like:
/volume1/your_folder_name
Creating a backup repository
A directory on NAS has been created, and now it’s time to create a backup repository in this directory. This will allow us to configure immutable backups after that.
- Go back to the web interface of the NAKIVO solution and navigate to Settings > Repositories. Click + and hit Create new backup repository.

The Create Backup Repository wizard opens.
- At the Type step, select Local Folder as mentioned in the requirements before. Hit Next at each step to continue.

- Define the needed parameters at the Name & Location step.
- Enter a backup repository name, for example, NAS Immutable.
- Select the assigned Transporter. If you have installed only the Transporter on your NAS (as in our example), then select this Transporter (10.17.193.82 in our case). If you have installed NAKIVO Backup & Replication Full Solution (Director + Transporter) on NAS, then select the Onboard Transporter.
- Enter the path to the local folder on the NAS device, where the Transporter is installed. The path to our backup folder is /share/CACHEDEV1_DATA/backup in our case.

- Make sure that the Store backups in separate files option is set in the Data size reduction settings at the Options step. This option is required to enable immutable backups. Hit Finish.

Wait until the backup repository is created.
Configuring Immutable Backups
Immutable backups in NAKIVO Backup & Replication are configured during backup job creation. You must add the platform where the source data resides to the NAKIVO inventory to back up this data. For example, if you add VMware vCenter Server to the inventory, then you can create a VMware VM backup job.
Let’s create a backup job for a Hyper-V virtual machine. Configuring backup immutability is identical for different source data platforms at the Options step of backup job wizard.
Create a backup job. Go to Jobs and select Backup for Microsoft Hyper-V. Complete all steps of the New Backup Job Wizard for Microsoft Hyper-V.

- Source. Select the virtual machine that you want to back up.

- Destination. Select NAS immutable as the destination backup repository. This is a backup repository previously created in a directory on the QNAP NAS.

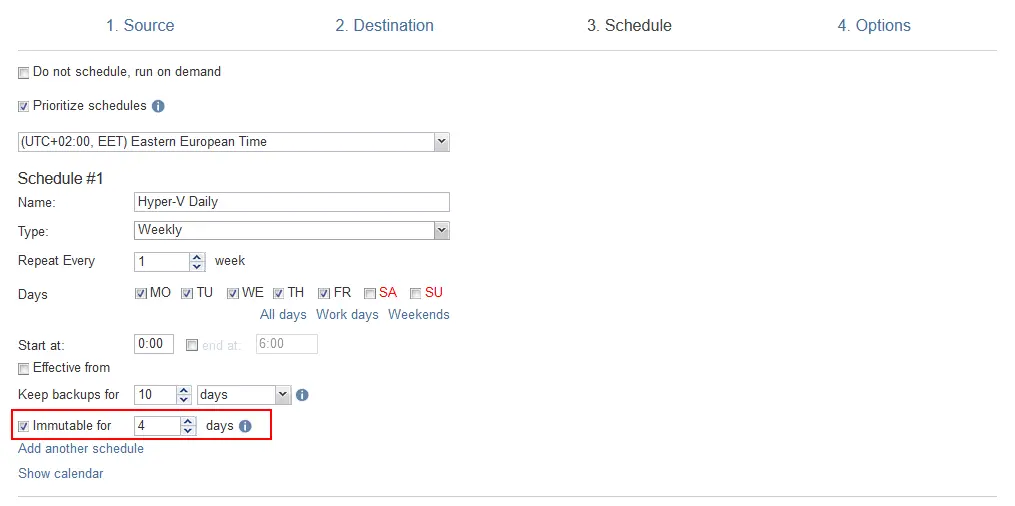
- Schedule. Configure schedule and retention settings. Select the Immutable for checkbox and enter the number of days to keep the backup immutable for this backup schedule. You can add more schedules and set immutability for them. This allows for flexible backup configurations.
- Options. Enter a job name and configure other job options to finish creating the backup job with immutability enabled.

Verifying and Managing Your Immutable Backups
The recovery points from an immutable backup cannot be modified and deleted. Nobody can change the immutability status of a backup, even the root user.
NAKIVO Backup & Replication includes backup verification features to ensure that a backup has finished successfully and that the backed-up data is consistent. For VM backups, you can use the Screenshot Verification feature to ensure that a VM can be restored from a backup. The backup test status and screenshot can be sent to an email. You can also verify that the data is ransomware-free with Backup Malware Scan.