Proxmox Installation Guide
Proxmox VE is a powerful type-1 hypervisor that runs virtual machines. To install Proxmox VE, you have two methods to choose from: installing the entire system, that is Linux Debian operating system with Proxmox VE, from an ISO image or installing Proxmox VE manually on Debian Linux.
This blog post explains how to install Proxmox VE using both installation methods, along with steps for post-installation configuration, to end up with a Proxmox server that is ready for work.

Proxmox System Requirements
Proxmox VE is light on hardware resources and can be installed on a wide range of hardware.
Minimum requirements
- A 64-bit Intel or AMD processor.
- Intel-VT and AMD-V instruction sets for hardware virtualization are supported by the CPU.
- 16 GB of disk space to install Proxmox. HDD or SSD with enough disk space to store VMs.
- 1 GB of RAM to install Proxmox and the additional amount of RAM to run VMs.
- At least one network card (network interface controller).
It is recommended that you use high-quality hardware to run Proxmox and VMs in production environments. Note that when using the ZFS file system (that supports thin provisioning for virtual disks) or Ceph, you need to provision at least an additional 8 GB for a start and increase this amount based on the installed amount of storage space.
Use multiple high-speed 1-Gbit (and faster) network interface controllers (NICs) for redundant network connections in case of a cluster setup.
Preparing for Proxmox USB Install
To install the complete Proxmox solution, you need to download the Proxmox ISO file and write the ISO image contents to a removable storage media.
- Download the ISO file from the Proxmox website:
https://www.proxmox.com/en/downloads/proxmox-virtual-environment/iso
- Select the needed version of the Proxmox installer and click Download.
In this case, the file name is proxmox-ve_8.1-2.iso because we are going to install Proxmox Server 8.

- Once the ISO Proxmox installer has been downloaded, write this ISO image to a USB flash drive or optical DVD media. Then, you can boot from this bootable medium and install Proxmox VE. A 1-GB (at least) USB flash drive is required.
Let’s go over how to prepare a bootable media to install Proxmox in Linux (in Windows, you can use utilities such as Rufus and Etcher):
- Insert a USB flash drive into the USB port of a computer. In this example, we use Linux. The commands are executed with root privileges. You can use
sudofor this purpose. - Check the names of the block devices with the following commands (you can run the commands before and after inserting a USB flash drive for identification):
lsblkdf -hdmesgNote the device name for your USB flash drive, for example, sdd, which contains a single partition sdd1.
- You may need to unmount the USB flash drive partition mounted to your Linux machine:
umount /dev/sdd1WARNING: All data will be erased from the USB flash drive after completing the next command.
- To write the Proxmox VE installer from the ISO file to a USB flash drive as a boot media, use the command in Linux:
dd bs=1M conv=fdatasync if=./proxmox-ve_8.1-2.iso of=/dev/sdd status=progresswhere:
dd – is a data duplicator utility included in Linux
bs=1M is a one-megabyte block size
if=./proxmox-ve_8.1-2.iso – the path to the input file, which data will be written to a USB flash drive
of=/dev/sdd – the path for the output
status=progress – display the progress status in the console
Wait until the utility writes data to a bootable USB flash drive. Then, insert this USB flash drive with a bootable Proxmox installer into a machine and boot from this device. Select a USB flash drive in UEFI/BIOS boot settings as the first boot device or press a hotkey to select a boot device for one time.
Using the Proxmox ISO Installer
Using the ISO Proxmox installer written to a USB flash drive is the preferred method to install Proxmox as a complete solution in the appliance format on dedicated servers. Once you have prepared a bootable USB flash drive, as explained in the previous section, boot from this media to start the installation:
- Select the interface for the Proxmox installer and press Enter:
- Install Proxmox VE (Graphical) – using the graphical user interface
- Install Proxmox VE (Terminal UI) – using a DOS-like pseudo-graphical user interface
- Install Proxmox (Terminal UI, Serial Console) – using commands in the command line interface
We select the Terminal UI (option 2) for Proxmox installation because it has the highest compatibility for older hardware and for the newest hardware to avoid possible video driver issues.

- Read and accept the Proxmox VE end-user license agreement (EULA).

- Select a target disk and file system to install Proxmox VE. Select Advanced options for configuration. Let’s select ZFS as the file system to install Proxmox and store VM files. We select ZFS because this file system supports thin provisioning for Proxmox VMs with the QCOW2 format of virtual disks.

- ZFS uses two or more disk devices and supports software RAID, such as RAID0, RAID1, etc. We select two hard disks and enable RAID 1. You can configure advanced ZFS options on the right side of the screen. Hit OK to save settings.

- Select regional settings, including the country, time zone, and keyboard layout. Hit Next at each step to continue.

- Enter the root password and confirm the root password. The Proxmox default username is root in this case. There is no Proxmox default password – you must set a custom password at this step. You can enter the administrator’s email address for communication.

- Select a network interface, which will be the interface for Proxmox management via the network (ens33 in this case). Enter the network configuration. In this workflow, we use the following parameters:
- Hostname (FQDN): pve.localdomain
- IP address (CIDR) and netmask: 192.168.101.226/24
- Gateway address: 192.168.101.2
- DNS server address: 192.168.101.2

- Verify the configuration summary for Proxmox installation. Select Automatically reboot after successful installation. If everything is correct, hit Install.

- Wait until the full Proxmox VE solution is installed from a USB flash drive.

- Once Proxmox VE is installed and rebooted, you can see the login screen in the console and the https link to access the web interface in a web browser.

- Open the displayed address (for example, https://192.168.101.226:8006/) in a web browser. Ignore the certificate warning and connect anyway.
- Enter the Proxmox credentials specified during the Proxmox installation and click Login.

- Now, you see the web interface for Proxmox VE management. You can perform post-installation configuration and deploy virtual machines (VMs). See the post-installation configuration section below for information on how to do this.

How to Install Proxmox on Debian
The alternative way to installing Proxmox VE as a complete solution (a lightweight Debian distribution + Proxmox VE) is manually after manually installing Debian Linux. For example, this deployment type can be useful if you use Debian and want to run virtual machines on your host, similarly as when using Linux and VMware Workstation.
We have already installed Debian with the default configuration (an SSH server is enabled), and we are going to install Proxmox on the machine running Debian.
Configuring the network
First of all, you need to have a proper network configuration. You need to set up a static IP address for your Debian server. By default, Debian is configured to obtain an IP address via DHCP. The following commands are run as root (with the root privileges):
- Install the net-tools package:
apt-get install net-tools - Check the current network configuration:
ifconfigAs we can see in the output, our network interface is ens33.

- Enable editing the configuration of the network manager by editing the appropriate configuration file:
nano /etc/NetworkManager/NetworkManager.confYou can use the pre-installed simple text editor nano or install the more advanced text editor vim with the
apt-get install vimcommand. - Change managed=false to managed=true in the NetworkManager.conf file.
Save changes to the file and quit the text editor (press Ctrl+O and press Ctrl+X in nano or press Esc, type
:wqand press Enter in vim).
- Restart the networking service to make the changes take effect:
service networking restart - Edit the network configuration set up in /etc/network/interfaces by opening this configuration file in a text editor such as nano or vim:
nano /etc/network/interfacesor
vim /etc/network/interfaces - Add the following lines to this network configuration file (you need to adjust the IP addresses and interface names according to your environment).
auto ens33iface ens33 inet staticaddress 192.168.101.229/24network 192.168.101.0broadcast 192.168.101.255gateway 192.168.101.2dns-nameservers 192.168.101.2
- Save configuration and quit the text editor.
Press Esc, type
:wqand press Enter in vim.Press Ctrl+O and press Ctrl+X in nano.
- Restart the network manager for the configuration changes to take effect:
systemctl restart NetworkManager - Check whether the IP address and network configuration have been changed:
ifconfig
- If this method didn’t help you configure a network interface, run the command to edit the network configuration in the pseudo graphical user interface directly in the Linux console:
nmtui - In the menu, hit Edit a connection and select your network interface (ens33 in this example). Enter the IP addresses in the appropriate fields and select additional options if needed. Hit OK to save the configuration.

- Edit the /etc/hosts file to ensure that the host name can be correctly resolved to the IP address.
nano /etc/hosts - Comment this line with the # character to deactivate it:
#127.0.1.1 deb-proxmox.domain.local deb-proxmoxAdd the following line and define the IP address directly for the correct configuration:
192.168.101.229 deb-proxmox.domain.local deb-proxmoxSave the configuration and quit the text editor.

- You can ping your Debian server to check whether the host name is resolved:
ping deb-proxmoxThe additional command to check how a DNS name is resolved:
hostname --ip-address
Adding a software repository
Add a Proxmox software repository to the configuration of Debian Linux. Proxmox VE packages will be downloaded and installed from this online repository:
- Add a Proxmox VE software repository to Debian Linux with the command:
echo "deb [arch=amd64] http://download.proxmox.com/debian/pve bookworm pve-no-subscription" > /etc/apt/sources.list.d/pve-install-repo.list - Add a repository key for the Proxmox repository:
wget https://enterprise.proxmox.com/debian/proxmox-release-bookworm.gpg -O /etc/apt/trusted.gpg.d/proxmox-release-bookworm.gpg - Verify that this key is correct by comparing a (hash) checksum:
sha512sum /etc/apt/trusted.gpg.d/proxmox-release-bookworm.gpgThe output must be:
7da6fe34168adc6e479327ba517796d4702fa2f8b4f0a9833f5ea6e6b48f6507a6da403a274fe201595edc86a84463d50383d07f64bdde2e3658108db7d6dc87 /etc/apt/trusted.gpg.d/proxmox-release-bookworm.gpg
- Update your software repository tree in Debian after adding the Proxmox repository:
apt update && apt full-upgrade - Install the kernel of Proxmox VE in Debian. Some packages that must be installed after that depend on this Proxmox VE kernel and specific compile flags.
apt install proxmox-default-kernel - Reboot the system to ensure that the system is booted with the Proxmox VE kernel components.
systemctl reboot - Install Proxmox VE packages in Debian with the Proxmox VE kernel:
apt install proxmox-ve postfix open-iscsi chrony - Remove the Debian kernel:
apt remove linux-image-amd64 'linux-image-6.1*' - Update and check the configuration of GRUB, the boot loader:
update-grub - If you don’t use multiple operating systems on a server where Proxmox is installed (dual boot), it is recommended that you delete the following package:
apt remove os-prober - At this point, you can open the Proxmox web interface:
https://your-ip-address:8006
We go to the following address in a web browser:
https://192.168.101.229:8006
You can make the post-installation configuration and deploy virtual machines in Proxmox VE.
You can also check this video guide on how to install Proxmox VE and get a host ready to run virtual machines:
Configuring Proxmox Virtual Environment
After installing Proxmox VE on Debian Linux, you may need to configure networking modes for VMs, such as bridged networking or routed networking (NAT). When you install Proxmox from an ISO file, a network bridge is configured out of the box, and Proxmox is ready to run VMs. The NAT network mode should be configured manually for both deployment types.
Configuring the bridged network mode for VMs
To create a network bridge in Proxmox VE installed on Debian manually, do the following:
- First, you need to edit the configuration of the existing Ethernet network interface. In the Proxmox VE web interface, select your Proxmox host, go to Network, select your network interface (ens33 in this example), and click Edit.
- Copy the parameters of the network interface and delete them from the configuration of this network interface (as displayed in the screenshot below). Save them to a text file or write them down somewhere. Deselect the Autostart checkbox.
In this example, we copied and deleted these parameters:
IPv4: 192.168.101.229/24
Gateway (IPv4): 192.168.101.2
Hit OK to save settings.

- In the Proxmox VE web interface, select your Proxmox host, go to System > Network, and click Create > Linux Bridge.

- Enter the needed parameters in the Create Linux Bridge window, including the parameters copied from the original ens33 network interface configuration. In this example, we use the following configuration for the bridged network interface:
Name: vmbr0
IPv4: 192.168.101.229/24
Gateway (IPv4): 192.168.101.2
Bridge ports: ens33
Adjust the parameters based on your environment.
Click Create.

- Reload the networking service by running the command in the console (shell/terminal):
service networking restartor reboot the host:
init 6
How to create a network bridge in the command line
The universal method to configure a network bridge in Linux, including a Proxmox VE server, is using the console (terminal). This is an alternative to using the Proxmox VE web GUI. To configure a network bridge, edit the network configuration file in the Debian Linux console by using a text editor, such as nano or vim.
- Open the network interfaces configuration file:
nano /etc/network/interfaces - Enter the needed parameters in the configuration file. An example of the network configuration with the bridge mode enabled:
auto loiface lo inet loopbackiface ens33 inet manualdns-nameservers 192.168.101.2auto vmbr0iface vmbr0 inet staticaddress 192.168.101.229/24gateway 192.168.101.2bridge-ports ens33bridge-stp offbridge-fd 0 - Change the needed values to adjust the configuration for your environment, save the configuration, and restart the networking service or reboot the host.
Configuring the NAT network mode
Once the bridged network mode has been configured, you can configure the NAT network mode. Configuring the NAT network mode for VMs on a Proxmox VE host can be configured in the command line only.
Add the second network interface to your Proxmox server (if you have had only one network interface) and enable this interface.
The second network interface used in this example is ens36. You can check the network interfaces by running the ifconfig command.

In this example, 192.168.101.0/24 is the physical network to which the Proxmox host and VMs with the bridged network mode are connected (these VMs are connected to the physical network just like physical machines).
Let’s create the 10.10.101.0/24 network as a virtual network for VMs running behind the router (NAT) in the NAT network mode. A Proxmox host will act as a router for these VMs.
- Edit the network configuration in a text editor:
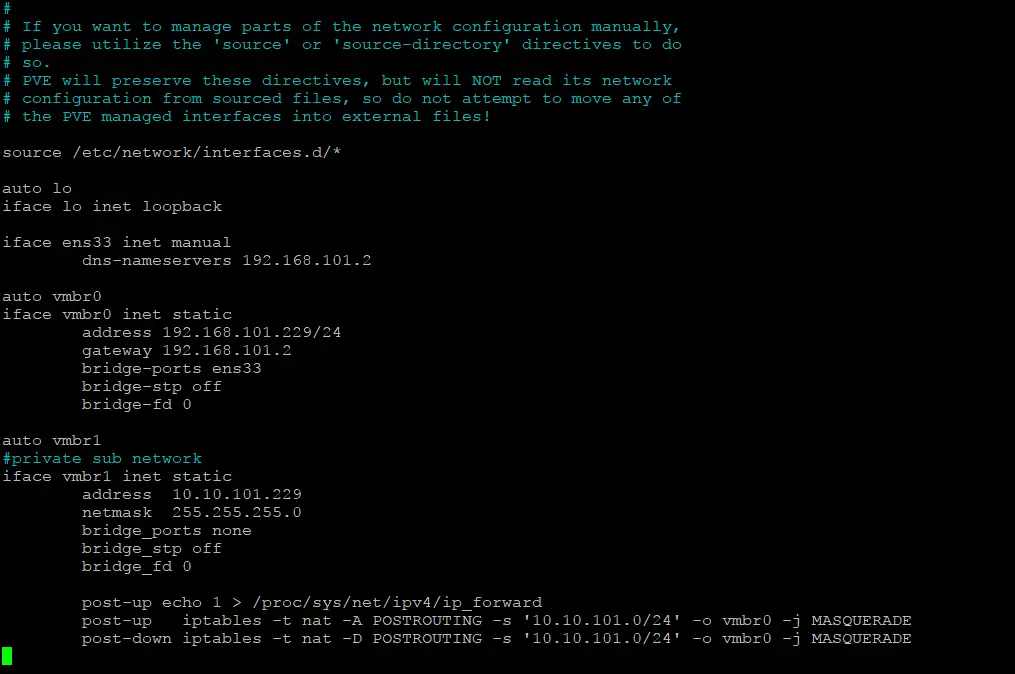
nano /etc/network/interfaces - Add the following lines at the end of the network configuration file:
auto vmbr1#private sub networkiface vmbr1 inet staticaddress 10.10.101.229netmask 255.255.255.0bridge_ports nonebridge_stp offbridge_fd 0post-up echo 1 > /proc/sys/net/ipv4/ip_forwardpost-up iptables -t nat -A POSTROUTING -s '10.10.101.0/24' -o vmbr0 -j MASQUERADEpost-down iptables -t nat -D POSTROUTING -s '10.10.101.0/24' -o vmbr0 -j MASQUERADEThese configuration lines create the second network bridge vmbr1 based on the second network interface ens36 (similarly as vmbr0 is connected to ens33). Additionally, there are lines enabling IP forwarding and basic routing configuration in iptables. If you didn’t configure the vmbr0 for VM bridged networking, you could use the ens33 network interface in the last two lines with iptables configuration. Moreover, you can configure the powerful firewall with iptables in Linux. The full content of the explained network configuration file is displayed in the screenshot below.
- Enable the second bridged interface created for connecting VMs using the NAT networking mode. VMs use this bridged connection similarly as a virtual switch (connected to the server’s network interface) in a virtual network and then the router with iptables is used for connection with external networks. Do this with the command:
ifup vmbr1
For more complex configurations, you may also need to add routes to the routing table.
In VM guests, we have to set 10.10.101.229 (the IP address of the Proxmox host for the router’s network bridged interface vmbr1) as a gateway in the guest OS network settings connected to the routed (NAT) network for the VMs.
A DHCP server is not configured at the moment. We need to manually set the IP configuration in VMs. You can configure a DHCP server on a Proxmox host in Linux or configure a DHCP server in a VM connected to the NAT network. DHCP server configuration for virtual machines on a Proxmox server is explained below.
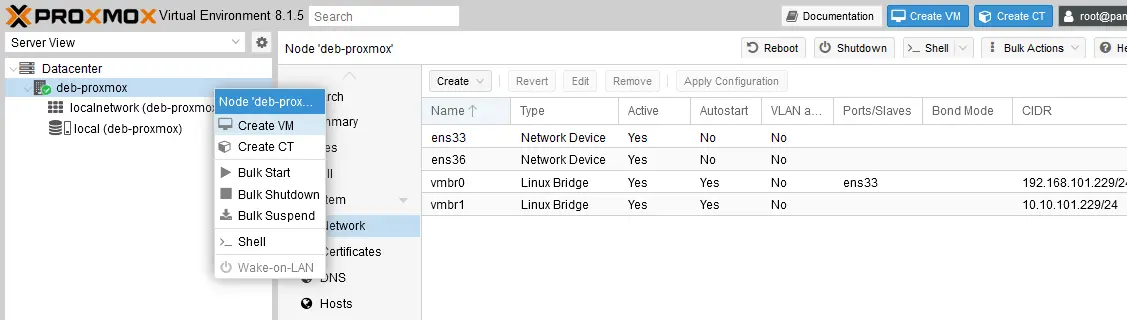
Now, the NAT network connection is displayed in the list of Network modes in the web interface of Proxmox VE in the Network section.
Configuring DNS relay
It is important to have proper resolution of DNS names to IP addresses for VM guests connected to the network in the NAT network mode, especially for connecting to resources on the internet. The easiest method to resolve DNS names in guest OSs of VMs is setting an IP address of a DNS server located outside the NAT network used for VMs. In this example, 192.168.101.2 or 8.8.8.8 DNS servers can be used for DNS configuration in Proxmox VMs.
The more elegant way to ensure that DNS name resolution in VMs works properly is configuring DNS relay on the Proxmox host. Below, you can see how to configure the DNS relay in the Proxmox server running on Debian. Run the following commands with root privileges:
- Install bind9, the DNS system for Linux:
apt-get install bind9 - Edit the Bind9 configuration file named.conf.local:
nano /etc/bind/named.conf.local - Add a new zone for DNS relay configuration. For example:
zone "domain-name.com" {type forward;forwarders {8.8.8.8;8.8.4.4;};};Replace “domain-name.com” with the domain for which you want to relay DNS queries. You can also use “.” to forward all DNS queries.
8.8.8.8 and 8.8.4.4 are public DNS servers powered by Google. You can replace 8.8.8.8 and 8.8.4.4 with the IP addresses of the DNS servers you want to forward queries to.
We add 192.168.101.2 as a DNS server to the first position in the list of DNS servers in this configuration file. 192.168.101.2 is a DNS server in our physical network. The bridged network adapter of our Proxmox host (vmbr0, whose IP address is 192.168.101.229) is connected to this DNS server 192.168.101.2.
In our case, the configuration in named.conf.local is the following:
zone "." {type forward;forwarders {192.168.101.2;8.8.8.8;8.8.4.4;};};
- After making the changes, restart the bind9 service:
systemctl restart bind9
Try to ping DNS names in a VM connected to the NAT network of the Proxmox host. Try to open a website using a link with the DNS name in a web browser. Now, DNS name resolution should work for Proxmox VMs.
Configuring a DHCP server
Configure a DHCP server on a Proxmox server for virtual machines connected to the NAT network. Having a DHCP server for this network will make the process of VM creation and basic VM configuration more convenient.
- Install ISC DHCP server on a Proxmox server. Run the commands with the root privileges.
apt-get install isc-dhcp-server - Edit the DHCP server configuration file:
nano /etc/dhcp/dhcpd.conf - Add the following configuration to dhcpd.conf:
subnet 10.10.101.0 netmask 255.255.255.0 {range 10.10.101.10 10.10.101.100;option routers 10.10.101.229;option subnet-mask 255.255.255.0;option domain-name "domain.com";option domain-name-servers 10.10.101.229, 8.8.8.8;}#host allowed_host {# hardware ethernet <MAC_ADDRESS>;# fixed-address 10.10.101.101;#}Where:
subnet 10.10.101.0 netmask 255.255.255.0 – setting a network for which the DHCP server will lease the IP addresses
range 10.10.101.10 10.10.101.100 – setting the range of IP address for DHCP clients (VMs) configured to obtain IP addresses automatically
option routers 10.10.101.229 – setting the IP address of the gateway, which will be set in the network configuration of VM guests (DHCP clients)
option subnet-mask 255.255.255.0 – setting the network mask, which will be set in the network configuration of DHCP clients
option domain-name-servers 10.10.101.229, 8.8.8.8 – setting the primary and secondary DNS servers, which will be set in the network configuration of DHCP clients
You can uncomment and replace <MAC_ADDRESS> with the MAC address of the host to which you want to assign a fixed IP address. You can add more host entries for additional hosts if needed.

- Edit the DHCP server interface configuration file:
nano /etc/default/isc-dhcp-server - Set the interfaces to listen on:
INTERFACESv4="vmbr1"In this case, we use IPv4 and set the DHCP server to lease IP addresses only for hosts connected to the vmbr1 bridged network interface (used for the NAT network for VMs). This restricts the DHCP server to listen on the vmbr1 (former ens36) interface only.

- After making the changes, restart the DHCP server:
systemctl restart isc-dhcp-server
Now the DHCP server should work for the NAT network, and you can check this. Set to obtain the IP address configuration automatically in a guest operating system (OS) of a VM connected to the NAT network on the Proxmox server.
Configuring update repositories
Other settings recommended to configure are Proxmox software repositories for updates. There are differences in how update repositories work for free usage and paid subscriptions.
Change a software repository from enterprise to community if you don’t have a paid subscription. Without an enterprise subscription, you cannot download packages from enterprise repositories. You can use community repositories without a subscription.
- Select your Proxmox server in the Datacenter and click the Shell button to open the console. This is the way to open the Linux console as an alternative to connecting via SSH in an SSH client to the Linux machine running Proxmox.

- Go to the directory where the configuration of software repositories is stored:
cd /etc/apt/sources.list.d/ - Open a configuration file in a text editor
nano /etc/apt/sources.list.d/pve-enterprise.listor
vim /etc/apt/sources.list.d/pve-enterprise.list - There is one line in this configuration file. Comment this line by adding the # character at the beginning of the line to make this setting inactive.
#deb https://enterprise.proxmox.com/debian/ceph-quincy bookworm enterpriseAdd the second line, which will set a software repository to be used for this Proxmox server.
deb http://download.proxmox.com/debian/ceph-quincy bookworm no-subscriptionPress Ctrl+O and Ctrl+X in nano;
press Esc, type
:wqand press Enter in vim to save changes and quit the text editor.
- Similarly, edit the ceph.list file:
nano ceph.list - Edit the content of the file in the same way by commenting the existing line and adding the second line as follows:
#deb https://enterprise.proxmox.com/debian/ceph-quincy bookworm enterprisedeb http://download.proxmox.com/debian/ceph-quincy bookworm no-subscription
- You can also edit this file:
nano /etc/apt/sources.list - Add these two lines to this file:
deb http://download.proxmox.com/debian/pve bookworm pve-no-subscriptiondeb http://security.debian.org/debian-security bookworm-security main contrib
- Now you can update a package list and upgrade the entire system, including Proxmox:
apt update && apt upgrade -y - Once the update and upgrade process is finished, reboot the Proxmox server:
init 6
You can open the Proxmox VE web interface and go to Updates > Repositories to view the current configuration with the list of software repositories used by the system.

Conclusion
Whether you’re migrating VMs from a VMware virtual environment to Proxmox VE or simply doing a Proxmox installation, the two methods provide freedom of choice and installation flexibility. Installing Proxmox using the ISO image suits better for a dedicated virtualization server. Manually Installing Proxmox VE on Debian Linux can be done for both dedicated servers and Linux workstations. It is recommended that you configure networking on a Proxmox VE server before deploying virtual machines. While there is a web interface for Proxmox VE management, most of the fine-tuning operations are done in the Linux console.
Remember that just like with other workloads, you should run backups of your Proxmox VMs to be able to recover full machines or objects when faced with data loss.