Navigating SharePoint Online Central Administration: Your Essential Guide
As a collaboration platform, Microsoft SharePoint gives system administrators the tools they need to manage multiple users, the content in SharePoint, and other configuration settings in the SharePoint admin center. Read on to learn about how the admin center enables centralized management of SharePoint and discover the available actions.
Introduction to Central Administration
SharePoint Central Administration is where administrators perform administration tasks in a SharePoint environment. Central Administration is divided into multiple parts and allows administrators to configure and manage SharePoint from a central location, including managing security, monitoring, general settings, system settings, and apps.
Overview and access methods
You have the choice of two versions of SharePoint. You can either install SharePoint Server on your physical servers or virtual machines or use the cloud-based version SharePoint Online (part of Microsoft 365). The SharePoint Central Administration portal for each version is slightly different.
Admin Center in SharePoint Server
When you install SharePoint on physical servers or VMs, a Central Administration site is created. Server administrator rights are required to access SharePoint Central Administration for standalone SharePoint Server deployments on-premises.
Find the folder with the SharePoint shortcuts in the Windows Start menu and open the SharePoint Central Administration tool (for example, SharePoint 2013 Central Administration). Run this file as administrator. The link to access the web interface for SharePoint running on physical servers depends on your configuration.
SharePoint Online Admin Center
When using SharePoint Online, SharePoint administration is done in the SharePoint admin center, which is integrated with Office 365 management tools and admin centers. You can access the SharePoint admin center by clicking a link from the Microsoft 365 admin center or by using a direct link. We will cover the details of using the SharePoint admin center below.
Using PowerShell for SharePoint Online administration
You can also use PowerShell to manage SharePoint Online by downloading SharePoint Online Management Shell or installing the required module from the PS Gallery.
You can install the needed PowerShell module with this command in PowerShell 5.0:
Install-Module -Name Microsoft.Online.SharePoint.PowerShell
Managing SharePoint Online with PowerShell can be useful for batch management tasks when you need to apply settings for a large number of entities.
Managing SharePoint Online
Go to https://admin.microsoft.com in your web browser to open the Microsoft 365 admin center. Then in the navigation pane or in the list of all admin centers, click SharePoint to open the SharePoint admin center.

As an alternative, open a direct link to access a SharePoint admin center in Office 365 by using the SharePoint central administration URL, for example:
https://yourcompany-admin.sharepoint.com
where yourcompany is your company (tenant) name.
In our case, we will use the following link to access the SharePoint admin center in Office 365:
https://nakivo-admin.sharepoint.com
On the homepage of the SharePoint admin center, you can see the file activity report, SharePoint site usage report for the last 30 days, service health, and message center. Hover over the chart to see the details for each point. Click Details near each graph to see more information for the last 7, 30, 90, or 180 days. Click the name of the activity in the legend under the graph to reveal or hide the activity type on the graph. In the left pane (also called the navigation pane), you can see the features and options that you can configure. At the bottom of the navigation pane, you can click Customize navigation to select the items you want to appear in the navigation pane.
The message center notifies the SharePoint administrator about improvements, new SharePoint features, and any changes that may affect SharePoint users. If you use SharePoint Online, all updates are installed automatically on servers running in the cloud (in Microsoft’s datacenters). If you click a message, the Office 365 admin center opens in a new tab to display detailed information. Hit All active messages to read all messages in the Office 365 admin portal.
The Service health section on the home page notifies you if any SharePoint Online services have been interrupted. Click View all services to check the status of all Office 365 services that are available in your subscription plan.

Let’s explore each section of the SharePoint Admin Center for Microsoft 365 to make it clear which settings you can configure and what effects these settings have. You can find these sections in the left pane of the web interface.
Sites
There are two sub-categories of sites: active sites and deleted sites.
Active sites
Use this page to manage all your sites. A list of active sites is displayed (with team sites and communication sites), including information about the site name, URL, storage usage, and primary admin. In the top right corner, there is a graph that indicates storage usage for all sites. There are two buttons to create a new site and export the active sites list to a CSV file.
Active sites are sites where users view pages, download/upload files, and edit/modify files. Click the appropriate column header to sort a list by site name, URL, used storage, etc. Use the search field to find the needed site. Click the button located on the right of the search field to filter sites that you want displayed in the list.

Click the site for which you want to edit options to open a window with site settings. There are four tabs: General, Activity, Permissions, and Policies.
- The General tab allows you to edit a site name and URL.
- The Activity tab shows information related to site activity and storage.
- In the Permissions tab, you can add/remove site admins and group owners.
- Use the Policies tab to edit site-sharing policies and determine the users with whom content can be shared.
These sharing settings are used to control sharing at the organization level and can be changed by a SharePoint administrator. Site owners cannot change these site-sharing settings.

Deleted sites
On this page of the SharePoint admin center, the list of deleted SharePoint sites is displayed. A SharePoint administrator can restore a deleted site within 93 days. When this period has elapsed, the site is deleted permanently. You can select a site in the list of deleted sites and hit Restore to recover the site or hit Permanently delete to delete it for good.

Policies
This section contains sharing policies and access control settings.
Sharing settings
These sharing settings are used to control sharing at the organization level in SharePoint and OneDrive. You can set settings from the least permissive to the most permissive. Four levels are available and content can be shared with:
- Anyone
- New and existing guests
- Existing guests
- Only people in your organization
A short explanation is available under each option for this page in the web interface of the SharePoint admin center. Let’s briefly look at all the settings on this page.

More external sharing settings
- Limit external sharing by domain (select domains from which users can/cannot access shared files)
- Allow only users in specific security groups to share externally
- Guests must sign in using the same account to which sharing invitations are sent
- Allow guests to share items they don’t own
- People who use a verification code must reauthenticate after this many days __
File and folder links
Choose the type of link that’s selected by default when users share files and folders in SharePoint and OneDrive.
- Specific people (only the people the user specifies)
- Only people in your organization
- Anyone with the link
Choose the permission that’s selected by default for sharing links
- View
- Edit

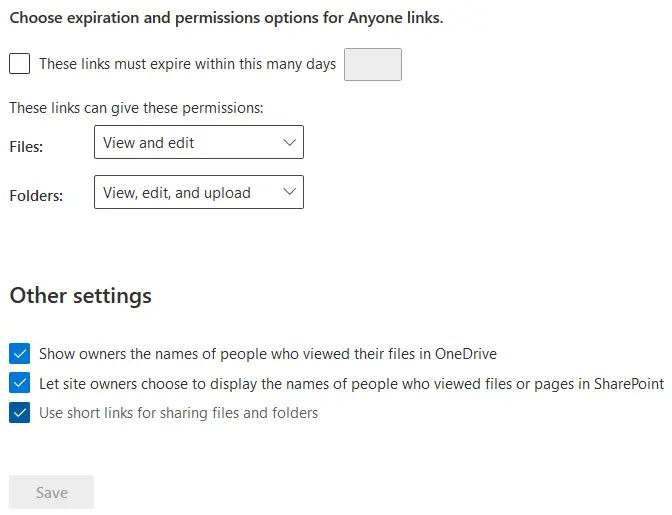
Choose expiration and permissions options for Anyone links.
- These links must expire within this many days __
- These links can give these permissions:
- Files: View and edit/View
- Folders: View, edit, and upload/View
(Select the needed options in the drop-down menu).
Other settings
- Show owners the names of people who viewed their files in OneDrive
- Let site owners choose to display the names of people who viewed files or pages in SharePoint
- Use short links for sharing files and folders
Access control
Use settings in this section to allow or restrict user access to SharePoint and OneDrive. There are four categories:
- Unmanaged devices. You can allow, limit, or block access for devices that are not in your domain, or if specific combinations of operating system and web browser don’t meet the set configuration.
- Idle session sign-out. This option is used for security purposes and allows the SharePoint administrator to set a period of idle time after which a user sees a warning and is then signed out.
- Network location. This option allows you to configure access to SharePoint only from trusted IP addresses. Note that when configuring this option, you have to add your own IP address to the list of allowed IP addresses; otherwise, you can block yourself out.
- Apps that don’t use modern authentication. This option allows or blocks access from third-party applications or old Microsoft Office applications (Office 2010 and earlier versions) that cannot enforce device-based restrictions.

Settings
The settings for the new SharePoint admin center are located on this page:
- Default admin center. If this option is enabled, a classic version of the SharePoint admin center is loaded by default when you open the admin center.
- Pages. Configure whether users can create modern pages and comment on these pages.
- SharePoint notifications. This setting allows users to receive notifications about SharePoint content, file activity, and news if they turn on notifications on mobile apps.
- Site creation. Turn on this option to let users create sites from the start page of SharePoint and OneDrive. It is possible to select a directory where users can create sites and a default time zone.
- Site storage limits. There are two options for these limits: automatic and manual. If you select the automatic option, then you let sites use as much of your organization’s storage as they need. If you select the manual option, you set specific limits for each site manually.

Content services
Content services help users enter data consistently and sort them by using metadata.
Term store
A term store provides more ways to store and organize data (including metadata) in SharePoint. A term store is a global site directory of common terms that you use in your organization. You can edit the local taxonomy for a SharePoint site, create and edit terms, and designate a person or group for the term set. In this case, the assigned labels don’t grant additional permissions but help you identify (track) users by a term set, for example, job title and department. This is the formal classification in the system.

Content type gallery
Create different content types, assign a category, and associate a template with the appropriate content type. You can set configurations to require users to use a standard document template. For example, when a user creates an Excel document by using a template, and the template is associated with a Timesheet content type, the user uses a correct and standardized template to create the same content type regularly.
Optionally, a content type can be added to a SharePoint list or library. A content-type gallery helps you better categorize your content.

Migration
This section provides the options for using the migration manager and SharePoint migration tool to migrate on-premises file shares to Microsoft 365. You can copy content from a standalone SharePoint Server to SharePoint Online and Microsoft 365.

More Features
This page provides the familiar SharePoint features that were available in the classic SharePoint admin center. Select the needed feature and hit Open to access feature settings.

If you have not found the needed options in the new SharePoint admin center, try to use SharePoint Online Management Shell, which is available for download at:
https://www.microsoft.com/en-us/download/details.aspx?id=35588
SharePoint Online Management Shell is a set of SharePoint cmdlets that allow you to manage SharePoint Online in Windows PowerShell.
Managing Licenses
As mentioned above, a SharePoint admin center is integrated with Office 365 and the Microsoft 365 admin center. If you need to manage user licenses in SharePoint Online, you can assign the licenses to your Office 365 users in the Microsoft 365 admin center by going to Users > Active users. Unlike traditional versions of SharePoint Server, no CALs (client access licenses) are used for SharePoint Online.

Conclusion
SharePoint central administration is used to manage SharePoint and allows system administrators to perform administrative tasks. However, you may have noticed that SharePoint admin center does not provide advanced backup and recovery functionality. For proper backup and point-in-time restores, you need a dedicated backup solution. NAKIVO Backup & Replication is a universal data protection solution for both SharePoint Server and Microsoft 365 apps and services.