Top 10 Proxmox CLI Commands Every Admin Should Know
Proxmox virtual environment (VE) can be managed with a user-friendly graphical interface in a web browser. However, in specific scenarios, it is better to use the command line interface (CLI). The CLI provides advantages such as more detailed configuration, batch processing, scripting and automation.
There are standard Linux commands and Proxmox-specific commands to manage Proxmox virtual environments. This blog post covers the top 10 Proxmox-specific commands with examples for effective administration.

1. qm
The qm command is one of the main Proxmox CLI commands, and qm is short for QEMU Manager. It is used to manage virtual machines (VMs) in a Proxmox virtual environment (Proxmox VE). Virtual machines on Proxmox are QEMU/KVM-based, and the qm command interacts with them. You can create, edit, configure, start, stop and migrate VMs with this command.
The general syntax of the command is:
qm [options] <command> [arguments]
List virtual machines
You can see the VM status and ID. You may need the ID to manage this VM in the Proxmox CLI.
qm list

Creating a new virtual machine
General syntax:
qm create <vmid> [options]
Example:
qm create 103 --name "DebianVM" --memory 2048 --net0 virtio,bridge=vmbr0 --sockets 1 --cores 2 --ostype l26
The following Proxmox CLI command creates a VM with ID 103 named “DebianVM” with 2GB RAM, 1 socket, 2 cores and a Virtio network interface bridged to vmbr0. The OS type is Linux (indicated by l26).
Attaching a disk to a VM
qm set 105 --scsi0 local-lvm:32G
Attaches a 32GB disk to the VM using the SCSI interface.
Attach a CD-ROM for OS installation
qm set 105 --ide2 local:iso/debian-10.7.0-amd64-netinst.iso,media=cdrom
This command attaches a Debian ISO to the VM’s IDE CD-ROM drive for installation of a guest operating system or other purposes.
Configuring the boot order
qm set 105 --boot order=ide2;scsi0
The command used in this example configures the VM to boot from the CD-ROM first (IDE2), then the disk (SCSI0).
Starting a virtual machine
Syntax:
qm start <vmid>
Example:
qm start 103
Starting the VM with ID 103
Stopping a VM
qm stop <vmid>
This command stops a running VM immediately. This way to stop a VM is the same as pulling the power plug on a physical machine.
qm stop 103
Stopping the VM with ID 103.
Shut down a VM in Proxmox CLI
qm shutdown <vmid>
This command shuts down a VM gracefully, allowing the guest OS to close files and terminate processes properly.
qm shutdown 101
Sending a shutdown signal to the VM with ID 101.

Migrating a VM to another node
qm migrate <vmid> <targetnode>
This command migrates a VM from its current node to another node within the same Proxmox cluster.
For example, to migrate a VM with the ID 103 to node2, we can use the command:
qm migrate 103 node2
Taking a snapshot of a VM
qm snapshot <vmid> <snapshotname>
The command creates a snapshot of the VM, capturing its current state, including the memory, disk and device status.
qm snapshot 103 "before_upgrade"
This command takes a snapshot of the VM with ID 103 and names it “before_upgrade“. Using the command to take a snapshot is useful before performing risky operations, such as software upgrades.
Restoring a VM state from a snapshot
qm rollback <vmid> <snapshotname>
This command rolls back a VM to a previous snapshot, restoring its state to the point when the snapshot was taken.
For example, if the software upgrade inside a VM was unsuccessful and failed, we can restore the VM state with the command:
qm rollback 103 "before_upgrade"
Any changes made since the snapshot was taken are discarded (undone).
Cloning a virtual machine
qm clone <vmid> <newid> [--name <newname>] [--full]
The qm clone command clones an existing VM to create a new VM with a different ID. You can choose to clone either the entire disk (full clone) or just the linked storage.
qm clone 103 104 --name "DebianClone" --full
This command clones the VM with ID 103 into a new VM with ID 104, naming it “DebianClone“. The ––full option creates a full clone, copying all data.
Resizing a virtual machine’s disk
qm resize <vmid> <disk> <size>
The qm resize command is used to resize a virtual disk attached to a VM, either expanding or shrinking it. Make sure that the guest OS can handle the change.
qm resize 103 scsi0 +10G
This Proxmox CLI command increases the size of the scsi0 disk on the VM with ID 103 by 10GB.
2. pve-firewall
The pve-firewall command is used to manage the firewall settings in the Proxmox virtual environment, including Proxmox clusters. This Proxmox CLI command provides friendly options for configuring firewall rules and allows administrators to control network traffic to and from Proxmox nodes, virtual machines, and containers. The Proxmox firewall integrates tightly with the Proxmox management interface and makes firewall management across the entire Proxmox environment more convenient. The pve-firewall tool is developed especially for Proxmox VE and uses a high-level abstraction to manage firewall rules compared to the more granular and manual approach used in iptables.
Syntax:
pve-firewall <command> [options]
Run the pve-firewall command to see the main command usage.

Check the status
Checking the status of the Proxmox VE firewall service:
pve-firewall status
The output displays whether the firewall is running or not on the current node.
Start the firewall
Starting the firewall service on the current Proxmox node:
pve-firewall start
Reload the firewall
Reloading the firewall service and applying the firewall configuration changes without the need to stop and start the firewall service.
pve-firewall reload
Accept SSH traffic
Creating a firewall rule that accepts SSH traffic:
pve-firewall create rule -action accept -macro ssh
This command creates a rule to allow SSH access to the Proxmox environment.
Where: create <object> creates a new firewall object, such as a rule, security group, or IP set.
Delete rule
To delete the rule, use the command:
pve-firewall delete rule <rule-id>
Display log
Display the firewall log, which shows traffic and rule matches:
pve-firewall log
The output displays the most recent firewall log entries.
Deny HTTP traffic
To create a firewall rule that denies any HTTP traffic, use the command:
pve-firewall create rule -action drop -macro http
3. pvesm
The pvesm command in Proxmox CLI is the command line utility that is used to manage the storage configuration in Proxmox VE. With this command-line tool, you can create, delete, modify, and manage storage pools. Additionally, you can perform various storage-related tasks, such as creating directories, adding storage devices, and managing content types.
Syntax:
pvesm <command> [options]
List storage
pvesm list <storage>
Where <storage> is the name of the storage pool (datastore) to list.
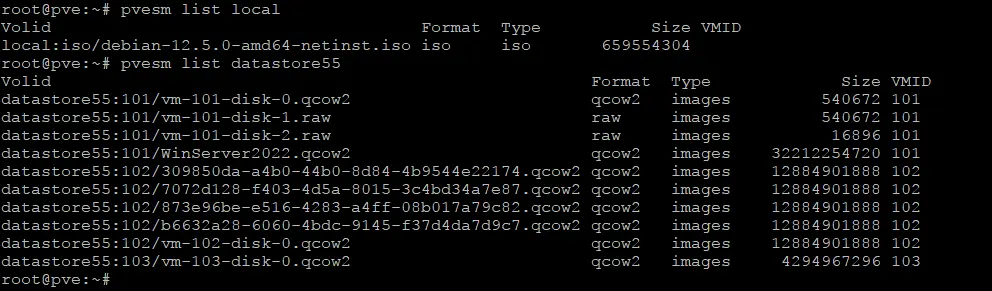
Checking the status of all or specific storage pools
pvesm status
The output displays the storage pool status, including information about whether it is active or inactive, the storage type, and current usage.

Creating a new storage pool
pvesm create <type> <storage-id> --options
Where:
<type> is the type of storage backend to create (for example, dir, lvm, nfs, zfs).
<storage-id> is the unique name or ID for the storage pool.
––options defines the additional options specific to the storage type.
Example:
Creating a new directory-based storage pool named new-datastore1 located at /mnt/storage-name, which can store VM images and ISO files:
pvesm create dir new-datastore1 --path /mnt/storage-name --content images,iso
Adding an existing storage backend to Proxmox VE
The principle of this command is similar to the pvesm create command, but instead of creating new storage, the storage that already exists is added to the Proxmox configuration to make it available.
Example:
Adding an existing NFS share located on 192.168.101.100 at /export/data to Proxmox VE under the name test-nfs-storage:
pvesm add nfs test-nfs-storage --server 192.168.101.100 --export /export/data --path /mnt/pve/test-nfs-storage --content images,iso
Modifying the configuration of an existing storage pool
pvesm set <storage-id> --options
Example:
Modifying the local-storage01 pool to allow it to store VM images, ISO files, and backup files:
pvesm set local-storage01 --content images,iso,backup
Allocating a new volume on a specified storage pool for a VM or container
pvesm alloc <storage-id> <vmid> <size>
Example:
The command to allocate a 10 GB volume on the local-storage-name pool for VM 100:
pvesm alloc local-storage-name 100 10G
4. pveum
The Proxmox Virtual Environment allows you to create multiple users for managing Proxmox VE. This can be done with Proxmox CLI commands by using the pveum (user management) command. Proxmox administrators can manage users and groups and configure access controls and permissions. This, in turn, defines who can have access and is permitted to take action on the different parts of the Proxmox infrastructure. Administrators can assign permissions to access objects, such as virtual machines, storage, cluster nodes, etc.
Syntax:
pveum <command> [options]
Adding the new user to Proxmox VE
pveum useradd <userid> --password <password> --comment <comment> --groups <group>
Where:
––password <password> is the password for the new user.
––comment <comment> is an optional comment or description for the user.
––groups <group> is the group (or groups) to which the user should belong.
Example:
pveum useradd user2@pve --password UserSecretPassword111 --comment "user2 – admin group" --groups admin
This command is used for adding a user whose name is user2 to the admin group with a description and setting the password for this user.
Deleting a user
To delete a user, use the pveum command with the same logic as for adding a user, for example:
pveum userdel user3@pve
This command is used to delete user3 on a Proxmox host.
Creating a group
To create a new group in Proxmox CLI, use the groupadd command.
Syntax:
pveum groupadd <groupname> --comment <comment>
Example:
pveum groupadd support --comment "Support Team Group"
This command creates a new group called support with the description “Support Team Group“.
Deleting a group
Similar to deleting a user, you can delete a group. For example, to delete a guests group, you can use the command:
pveum groupdel guests
Adding roles
Roles are used to define a set of permissions for users and groups to whom this role is assigned.
Syntax:
pveum roleadd <rolename> --privs <privileges>
Where:
<rolename> is the name of the role to create.
––privs <privileges> is a comma-separated list of privileges to assign to the role (for example, VM.PowerMgmt,VM.Config.Disk).
Example:
pveum roleadd vmmanager --privs VM.PowerMgmt,VM.Config.CDROM
This command creates a role called vmmanager with permissions to manage VM power settings and configure CD-ROMs.
Modifying an existing role
Administrators can modify existing roles and permissions with the rolemod command (add or remove privileges).
Syntax:
pveum rolemod <rolename> --privs <privileges>
Example:
pveum rolemod vmmanager --privs +VM.Config.Network
This command adds the VM.Config.Network privilege to the vmmanager role.
Modifying ACL
Proxmox administrators can modify Access Control Lists (ACL) by assigning roles to users or groups on specific Proxmox objects.
Syntax:
pveum aclmod <path> --roles <rolename> --users <userid> --groups <groupname>
Where:
<path> is the object path on which to set the ACL (for example, /vms/100 for a specific VM or / for the entire cluster).
––roles <rolename> is the role to assign.
––users <userid> is the user to whom the role is assigned.
––groups <groupname> is the group to whom the role is assigned.
Example:
pveum aclmod /vms/104 --roles vmmanager --users user4@pve
This command assigns the vmmanager role to user4@pve on VM 104, allowing the user (user4) to manage that specific VM according to the privileges in the vmmanager role. The aclremove command is used to remove ACLs from objects accordingly.
Authentication realm management
An authentication realm defines how users authenticate with the system (for example, using PAM, LDAP, or Active Directory). You can manage authentication realms with the realm command in Proxmox VE.
Syntax:
pveum realm <command> [options]
Where the command can be:
list to list all available realms
add to add a new realm
modify to modify an existing realm
remove to remove an existing realm
For example, to list all the authentication realms configured in Proxmox VE, use the command:
pveum realm list

Managing existing users
You can list, edit, and delete existing users with this user command.
Syntax:
pveum user <command> <userid> [options]
The commands can be:
list to list all users
modify to modify user details, such as changing a password or updating the comment
delete to delete a user
For example, to list all users on a Proxmox host, use the command:
pveum user list
To see more available commands and options, run the pveum help command in Proxmox CLI.
5. pvesh
By using the pvesh command, administrators can interact with the Proxmox REST API. This command-line tool allows you to perform almost any action that can be done via the Proxmox web interface directly from the Proxmox CLI. The pvesh command acts as a shell for the Proxmox VE REST API, allowing you to make API calls using commands directly from the command line. With this command, you can manage virtual machines, storage, network, and other elements of the Proxmox virtual infrastructure.
Syntax:
pvesh <command> [options]
Listing resources or API endpoints
This command is similar to the ls command in Linux, but it lists available API paths or resources in the Proxmox VE environment.
pvesh ls /path
Example:
pvesh ls /cluster/resources
This command lists all resources in the Proxmox cluster, including VMs, containers, and storage.
Retrieving information
The get command retrieves information from a specific API endpoint. This command is used to query a resource for details.
pvesh get /path
Where path is the API path from which you want to retrieve information.
For example, to retrieve the status information for the node pve-node1, such as CPU load, memory usage, and uptime, you can use the command:
pvesh get /nodes/pve-node1/status

Modifying the configuration
The set command is used to modify or update the configuration of a resource. This is equivalent to making a POST or PUT request in the REST API.
Syntax:
pvesh set /path --key value [--key value ...]
––key value is the key-value pairs of the settings you want to change.
Example:
pvesh set /nodes/pve-node1/qemu/100/config --name new-vm-name
This command changes the name of VM 100 on the node pve-node1 to new-vm-name.
Creating a resource
The create command allows you to create a new resource, such as a new VM or storage volume.
Syntax:
pvesh create /path --key value [--key value ...]
For example, you create a new VM with specific parameters with the command:
pvesh create /nodes/pve-node1/qemu --vmid 106 --name new-vm-name --memory 2048 --cores 2
This command creates a new VM with ID 106 on the node pve-node1, with the name new-vm-name, 2 GB of RAM and 2 CPU cores.
Starting VMs
There is a command to start a VM or container with pvesh:
pvesh start /path
For example, to start the VM with ID 101 on the node pve-node1, you can run the command:
pvesh start /nodes/pve-node1/qemu/101
VM shutdown
Unlike the stop command, the shutdown command shuts down a VM or container gracefully:
pvesh shutdown /path
For example, to shut down a VM with the ID 101 on a Proxmox host, whose name is pve-node1, use the command:
pvesh shutdown /nodes/pve-node1/qemu/101
Starting all VMs
To start or stop all VMs on a node or in the entire cluster, you can use the corresponding command:
pvesh startall /nodes/<nodename>
pvesh stopall /nodes/<nodename>
6. pvecm
The pvecm command is a tool for Proxmox cluster management that is used to manage and configure a Proxmox cluster. You can use this tool to create a cluster as well as join and manage the nodes within a Proxmox cluster. A cluster is managed as a single entity with configuring features, such as High Availability, live VM migration, shared storage, etc.
Syntax:
pvecm <command> [options]
To see all supported pvecm commands, run this command:
man pvecm
Creating a cluster
To create a new Proxmox VE cluster, you can use the create command. You should run this command on the first node (master node) that will form the cluster.
pvecm create <clustername>
Example:
The command below creates a cluster named cluster01. This node (where we run the command) becomes the master node of the cluster.
pvecm create cluster01
Adding a node to a cluster
Use the addnode command to add new nodes to an existing Proxmox cluster. Run this command on a node that you want to add to the cluster.
pvecm add <master-node-ip>
Example:
Adding the current Proxmox host to a cluster controlled by a master node with the IP address 192.168.101.121:
pvecm add 192.168.101.121
Deleting a node from a cluster
The delnode command is used in Proxmox CLI to remove a node from the cluster.
Syntax:
pvecm delnode <nodename>
Example:
The command to remove the node named pve-node2 from the cluster is:
pvecm delnode pve-node2
Listing all nodes of a cluster
The command to list all cluster nodes and display their status, including node names and IP addresses, is:
pvecm nodes
Setting the new master node
You can set another cluster node to be a master in a Proxmox cluster:
pvecm setmaster <nodename>
Where <nodename> is the name of the node you want to designate as the master.
Displaying the cluster status
You can display the status of a Proxmox cluster, including information about the quorum, the number of nodes, and their roles.
pvecm status
Setting the expected number of nodes
You can check how many nodes are expected to achieve the quorum in the cluster with the expected command. You may need to use this command when some cluster nodes are temporarily offline to avoid disruptions. Quorum is used to avoid split-brain situations when different cluster nodes have conflicting information about the state of the cluster.
pvecm expected <number>
7. hamanager
The hamanager command is used to manage the High Availability (HA) feature for virtual machines after creating a Proxmox cluster. This command line utility allows you to configure High Availability for critical VMs and set how to restart them in a cluster if the node they are running on fails. The hamanager tool in Proxmox CLI interacts with Proxmox High Availability Manager.
Syntax:
ha-manager <command> [options]
Viewing status
To view the current status of the HA resources you can use the command:
ha-manager status
The output displays information about which VMs or CTs are configured for HA, their current state (started, stopped), including the HA state and failover state, and which node they are running on.
Enabling HA for a VM
Syntax:
ha-manager add <vmid> --group <groupname> --max-restarts <n> --max-migrate-tries <n>
Where:
<vmid> is the ID of the VM or CT you want to add to HA.
––group <groupname> is the HA group to which the resource should be added (optional).
––max-restarts <n> is the maximum number of restart attempts if the resource fails.
––max-migrate-tries <n> is the maximum number of migration attempts to another node if the resource cannot be restarted.
Example:
Adding a VM with ID 105 to the HA manager with a maximum of 3 restart attempts and 1 migration attempt in case of failure:
ha-manager add 105 --max-restarts 3 --max-migrate-tries 1
Disabling the HA status of a VM
Use the remove command to disable the high availability status of a virtual machine and remove the VM from the HA manager.
ha-manager remove <vmid>
For example, to disable the HA status for the VM with ID 105, run the command:
ha-manager remove 105
After running the command, the VM will no longer be managed as a highly available resource.
VM migration
You can manually migrate a highly available VM to another node in the cluster with the migrate command:
ha-manager migrate <vmid> <targetnode>
For example, to migrate a VM with ID 106 to a node called pve-node2, run the command:
ha-manager migrate 106 pve-node2
8. vzdump
The vzdump command is used to create backups in Proxmox VE with native Proxmox tools. This command supports backup of VMs and containers. Backups can be saved in .vma, .tgz or .lzo format.
Syntax:
vzdump [options] <vmid> [<vmid2> ...]
Where:
vmid is the ID of a VM or container you want to back up.
––mode <mode> defines the backup mode. There are three supported backup modes:
- snapshot – takes a live snapshot of a Proxmox virtual machine or container. This mode is used by default and allows you to perform a backup when a VM or container is running.
- suspend – this mode is used to suspend the VM or container before backing up which allows you to ensure that data is consistent. Short downtime caused by this mode is a disadvantage.
- stop – stops the virtual machine or container before performing the backup. This approach allows you to preserve backup data consistency but requires more extended downtime.
––compress <type> is used to specify the compression method. There are three supported compression options:
- lzo – lightweight and fast compression for Proxmox backup (used by default).
- gzip – this is a more efficient compression method but requires more time to compress data (slower compression).
- zstd – This compression type uses a modern compression algorithm offering high compression ratios with optimal performance.
––storage <storage> specifies the storage target for the backup file. This can be a local directory, an NFS share, or a Proxmox storage pool.
––maxfiles <n> limits the number of backup files to keep. Older backups are deleted automatically if the limit is reached.
––remove <mode> automatically removes backup files according to the specified mode. Modes include:
- old – removes old backups when new ones are created.
- fail – removes failed backups only.
Back up multiple VMs
Back up VMs with the IDs 101, 102, and 103 sequentially:
vzdump 101 102 103
Save backup with compression
vzdump 101 --storage local --compress gzip --maxfiles 3
The vzdump command with these options makes the following actions:
- Saves the backup of VM 101 to the storage named local. Local storage could be a local directory on a Proxmox host or a storage pool.
- The gzip compression is used. Creating a backup encrypted with gzip compression may take longer, but you end up with a smaller backup file.
- Only the 3 most recent backups are kept, while older ones are deleted automatically.
Omit log files
vzdump 102 --exclude-path /var/log
Backs up VM 102 but excludes the /var/log directory, reducing the size of the backup by omitting log files.
Remove old backups
vzdump 101 --storage nfs-backup --maxfiles 5 --remove old
This is an automated backup with the removal of old backups. It backs up VM 101, stores the backup in nfs-backup storage, and keeps only the 5 most recent backups, deleting any older backups automatically.
Back up in snapshot mode
vzdump --all --mode snapshot --storage nfs-backup --bwlimit 20480 --remove old --maxfiles 7
Creating backups (such as a nightly backup) of all VMs and containers using the snapshot backup mode. The backups are saved to an NFS share called nfs-backup. The bandwidth is limited to 20480 Kbytes per second (20 MBps) to prevent network overload. Only the last 7 backups are retained, and older backups are automatically removed.
9. qmrestore
The qmrestore command is used to restore virtual machines from backups created using the vzdump command in the Proxmox virtual environment. These vzdump and qmrestore commands are native Proxmox tools for VM backup and recovery. A backup can be restored to a new or existing VM.
Syntax:
qmrestore [options] <backupfile> <vmid>
Where:
<backupfile> is the path to the backup file you want to restore. This file is typically generated by the vzdump command and stored in a directory or on a network storage device.
<vmid> is the ID of the VM you want to restore. If the VM ID already exists, the existing VM will be overwritten unless specific options are used to prevent this.
Command options:
––force is used to overwrite an existing VM with the same ID, and there is no confirmation question. You can use this option to restore a VM when you don’t mind losing the current state of the virtual machine with the same ID.
––unique is used to generate a new, unique VM ID for a restored VM. Consider using this option to restore a backup by creating a new VM without overwriting any existing VMs.
––storage <storage> specifies the target storage location for virtual disk images of the restored VM. If this option is not specified, then the VM will be restored to its original storage or to default storage.
––pool <pool> allows you to assign the restored VM to a specific resource pool in the Proxmox virtual environment. Resource pools are used to group virtual machines for easier management.
––hostname <name> sets the hostname of the restored VM. This option is useful if you want to set a different hostname for the restored VM from the original hostname.
––name <name> sets a custom name for the restored VM (a name that is displayed in the Proxmox user interface), different from the original VM name that was backed up.
Restore VM to original ID
Restoring a VM to its original ID:
qmrestore /var/lib/vz/dump/vzdump-qemu-101-2023_08_27-00_00_00.vma 101
This command restores the backup file vzdump-qemu-101-2023_08_27-00_00_00.vma to the VM with ID 101. If a VM with ID 101 already exists, it will be overwritten.
Recover backup to new VM
Restoring the backup to a new VM:
qmrestore /mnt/pve/nfs-backup/dump/vzdump-qemu-101-2023_08_27-00_00_00.vma 102 --storage local-lvm
This command estores the backup to a new VM with ID 102, storing its disk images on the local-lvm storage.
Recover and change hostname and VM name
Restoring the backup and change the hostname and name:
qmrestore /mnt/pve/nfs-backup/dump/vzdump-qemu-101-2023_08_27-00_00_00.vma 103 --hostname restored-vm --name "MyRestoredVM"
Restores the backup to a new VM with ID 103, renames the VM to MyRestoredVM and sets its hostname to restored-vm.
10. proxmox-backup-client
The proxmox-backup-client command is a command-line utility used in conjunction with Proxmox Backup Server, a native Proxmox backup solution, used for backup and restore operations. This tool allows administrators to protect virtual machines, containers, and other types of data. The proxmox-backup-client tool interacts with a Proxmox Backup Server (PBS) to manage backups
Syntax:
proxmox-backup-client <command> [options]
The basic syntax of the backup command
proxmox-backup-client backup <archive-name> <path> --repository <repository> [options]
Where:
<archive-name> is the name you want to give to the backup archive.
<path> defines the path to the directory or file you want to back up.
––repository <repository> is the target repository on the Proxmox Backup Server, typically in the form of user@pbs:datastore
Example:
proxmox-backup-client backup etc.pxar /etc --repository root@pbs@10.10.10.101:datastore1
This command backs up the /etc directory to the datastore1 on the Proxmox Backup Server located at 10.10.10.101. The backup is stored as an archive named etc.pxar.
The basic syntax of the restore command
The restore command for the proxmox-backup-client command-line tools is used to restore data from a Proxmox Backup Server to the local system.
proxmox-backup-client restore <archive-name> <path> --repository <repository> [options]
Where:
<archive-name> is the name of the archive you want to restore.
<path> is the path where the data should be restored.
––repository <repository> is the repository where the backup is stored.
Example:
proxmox-backup-client restore etc.pxar /restore/etc --repository root@pbs@10.10.10.101:datastore1
This command restores the etc.pxar archive from datastore1 on the Proxmox Backup Server at 10.10.10.101 to the local directory /restore/etc.
Conclusion
Proxmox CLI commands are a powerful set of tools for managing the Proxmox virtual environment, including storage, virtual machines, clusters, VM backup, etc. If you want to implement a comprehensive VM backup strategy, install NAKIVO Backup & Replication and use the agentless backup capability for Proxmox VE VMs.