Using VM Templates to Clone Hyper-V VMs
One major advantage of hardware virtualization is scalability. You can easily add virtual disks to your VMs, expand those virtual disks, expand the capacity of your hardware storage, and add more CPU performance and memory in addition to deploying a larger number of VMs. You can copy VM files from one Hyper-V host to another or even copy VM files on the same Hyper-V host to create additional identical VMs.
The primary disadvantage of this method is the need to manually change hostnames, the IP address (if a static IP address is used), and SID (security identifier). By using VM templates, you can avoid these issues and create new VMs quickly and conveniently. This blog post explains Hyper-V VM templates in detail and explores how to clone Hyper-V VMs step by step.

Understanding VM Cloning and VM Templates
When you need to deploy a large number of virtual machines (VMs) in your Hyper-V virtual environment, VM cloning can be more efficient than deploying each VM individually and configuring each guest operating system (OS) manually.
What is VM cloning?
VM cloning is the copying of one virtual machine one or more times to create identical VMs with the same guest OS, software, and virtual hardware configuration. Cloning virtual machines can be used for different purposes, such as testing new software configurations, deploying multiple instances of virtual servers with identical settings, or developing staging environments.
The benefits of VM cloning
VM cloning allows you to quickly deploy multiple VMs with identical configurations without having to deploy and configure each new VM individually. The benefits of creating Hyper-V VM clones include:
- Fast VM deployment. VM cloning allows you to provision new VMs and software instances faster and save time and resources. This approach cuts the time needed to set up new environments.
- Consistency. VM clones are identical to the original VM. This reduces the risk of human error when configuring and deploying multiple VMs.ma
- High scalability. With VM clones, you can scale virtual environments, which is especially useful for dynamically changing environments.
A method to create Hyper-V VM clones is using VM templates. Let’s go over what they are in the next section.
What are VM templates?
A VM template in Hyper-V is a base image that can be used to create new Hyper-V VMs while preserving software that was installed and configured on the VM used to create the template. You don’t need to worry about spending too much time creating a new empty VM from scratch, installing applications, and configuring software. You also don’t need to copy virtual disks (VHD or VHDX) or an entire existing VM and spend time reconfiguring that VM.
You can create one reference VM and use it to create a template, which can later be used to deploy multiple new VMs. If you are working with a large number of VMs, the most rational approach is to clone Hyper-V VMs. You can consider your Hyper-V VM template as a master pattern that includes not only software configuration but also configuration for VM CPU, RAM, and other virtual devices.
Hyper-V VM templates can be created with Hyper-V Manager, which is a built-in Windows software product, or with System Center Virtual Machine Manager (SCVMM), which is paid software geared towards centralized management of large Hyper-V virtual environments.
The benefits of VM Templates
VM templates are developed for VM cloning and mass deployment, providing the following advantages:
- Standardization. By using VM templates, you can create standardized configurations for VMs, including software installed inside VMs, ensuring consistency across your environment.
- Efficiency and scalability. Using VM templates saves you time because you don’t need to deploy and configure each VM manually from scratch. You need to create a template once and then use this template multiple times to deploy identical VMs. This way, you can deploy a large number of VMs quickly to scale up the environment for development, testing, or other purposes.
- Fewer errors. Virtual machine templates reduce the risk of errors when deploying VMs with the same configuration. You need to create, configure, and test a template once and then use this template to deploy consistent VMs.
Creating Hyper-V VM Templates
There are two main options for creating Hyper-V VM templates for VM cloning, depending on the deployment configuration and scenario:
- On Hyper-V hosts with Hyper-V Manager in the graphical user interface (GUI) and command line interface (PowerShell).
- In System Center Virtual Machine Manager (SCVMM) used for centralized management of large virtual environments with multiple hosts. A GUI and PowerShell are available.
Prerequisites
You should use the sysprep utility to create VM templates safely to avoid possible network conflicts in the future.
Sysprep is a built-in system preparation Windows utility that is available for all editions of desktop and server Windows versions, starting with Windows 7 and Windows Server 2008. It is intended to duplicate existing Windows installations and deliver new installations based on existing Windows installations. This utility can be used to prepare images to be duplicated onto a large number of machines with identical hardware. This is the preferred approach for many major manufacturers of laptops.
You have, most likely, already seen that when you power on a new laptop with Windows OS for the first time, Windows is already installed on that laptop, and you need to configure particular settings such as username, hostname, time zone, and language. Hyper-V virtual machines of the same generation have the same virtual hardware, which implies that you can also use this method as a preparation step to clone Hyper-V VMs.
Sysprep is located in the C:\Windows\system32\sysprep\ directory (%WINDIR%\system32\sysprep) and can be executed in command line mode or GUI (graphical user interface) mode.
Sysprep resets information stored in Windows settings such as SID (security identifier), event log, temporary folders, hostname, and time zone. You need to input this information for a VM clone using the First Run wizard after cloning a VM from the template. If your Windows copy has been activated, then the activation gets reset. Note that the activation cannot be reset more than three times. If a source VM is joined to the Active Directory domain, your Hyper-V VM template and VMs cloned from that template will have the same Domain SID (note that this is not the same as the machine SID mentioned above).
It is recommended that the reference (original) VM is not a member of an Active Directory domain. This is because the domain SID (not the machine SID) is copied to VM clones, which leads to issues in the domain.
How to Clone a Hyper-V VM by Using VM Templates
Let’s explore the entire process of how to clone a Hyper-V VM successfully by using Hyper-V VM templates:
- Create a new Hyper-V VM.
We already have a blog post about how to create a new Hyper-V VM in Hyper-V Manager. Alternatively, you can use PowerShell to create a new VM.
- Install a guest operating system (OS).
Install a guest OS that is supported by Hyper-V – for example, Windows 7, 8, 10, 11 or Server 2008, 2012, 2016, 2019, 2022, etc.). The workflow to create a Hyper-V VM template and VM clones is identical for these guest OS versions.
- Install all needed security patches and updates for your guest OS.
You need to perform this time-consuming procedure once to get VMs without known vulnerabilities at the end.
- Install the needed software and configure that software.
Uninstall unnecessary applications and components to reduce the size of your Hyper-V VM template.
- Use the sysprep utility to prepare a master image for cloning.
Connect it to your Hyper-V VM (we use a VM running Windows 7 in our example), which will be used as the base VM. Go to the directory where sysprep is located – this directory is C:\Windows\system32\sysprep\ by default.
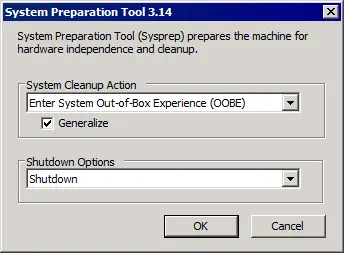
Run the sysprep.exe file on your guest Windows and select the following parameters:
- System Cleanup Action – Enter System Out-of-Box Experience (OOBE). This option unlinks Windows from a particular hardware device (including virtual hardware).
- Select the Generalize checkbox, which, in turn, resets Windows activation. It is recommended that you enable this option to prevent possible activation issues after cloning a Hyper-V VM from a template.
- Select Shutdown in the drop-down menu of Shutdown Options. You need this option to make sure that no application (Hyper-V in this case) has opened the virtual disk file and that the data stored on the virtual disk is not being changed.
Note: If you select Enter System Audit Mode as the System Cleanup Action option, your Windows will boot directly to the desktop before getting to the Welcome screen. This option allows you to finalize your Windows configuration before creating a Hyper-V VM template. For example, you can delete unnecessary users from the operating system. Another way to enter a System Audit Mode is by pressing Shift+CTRL+F3 on the Welcome screen (Regional settings).
Click OK to proceed.
Alternatively, you can run CMD, change the directory to %WINDIR%\system32\sysprep and run the command:
sysprep /generalize /oobe /shutdown /mode:vmWhere
/mode:vmis a new option, which should be used only to create reference images for virtual environments such as Hyper-V. Using this option makes the first VM boot faster because there is no need to detect new hardware, given that the same generation of VMs uses the same virtual hardware.After that, you can see a window with the message “Sysprep is working”. At this point, you should wait until the process is finished. If you have selected the same sysprep options, your VM will be powered off once the OS preparation process is finished. Don’t power on the machine until the template is created, otherwise you will be required to run sysprep once again to prepare the VM for creating a Hyper-V VM template.
- Delete all checkpoints.
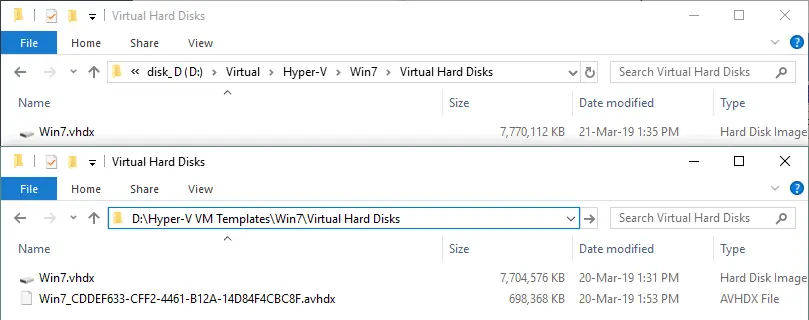
If you have any checkpoints in place for this VM, be sure to delete them all before exporting a Hyper-V VM to a template, which you can do in the Checkpoints section of Hyper-V Manager. Right-click each checkpoint and click the Delete Checkpoint option in the context menu (see the screenshot below). Differencing virtual disks (AVHDX files) will merge with the main virtual disks (VHDX files) if you delete snapshots (checkpoints) that represent a VM state at a point that precedes the point where you are now.

- Export a Hyper-V VM to a VM template.
Select the VM you have prepared, right-click the VM name in Hyper-V Manager, and click Export.

Specify where you want to save the files. The path D:\Hyper-V VM Templates\ is used in this example. You can enter this path manually or by clicking the Browse button to select the necessary folder. Click Export and wait until the exporting process is finished.

Now you can see VM files in the directory you specified before (in this case, in D:\Hyper-V VM Templates).
Note: If you have a file server that uses SMB protocol for accessing files in your network, you can create a shared folder on a file server and copy various Hyper-V VM templates there. This scenario is convenient when you have multiple Hyper-V servers on which you need to deploy VMs from templates.
Cloning Hyper-V VMs Using VM Templates (Import)
Once a Hyper-V VM template is created, you can use this template to create new VM clones.
Importing a virtual machine from the Hyper-V VM template.
Right-click the name of the Hyper-V host on which you want to deploy a new VM from the Hyper-V VM template. In the context menu, click Import Virtual Machine.

The Import Virtual Machine wizard opens. Click Next on each step to advance.
- Before You Begin. As there is nothing to configure at this introductory step, you can go on to the next step.
- Locate Folder. Indicate the folder that contains the virtual machine you want to import. In our example, we are using D:\Hyper-V VM Templates\Win7.

- Select Virtual Machine. Select the virtual machine you want to import from the list. In this case, only the files of one VM are stored in the selected folder.

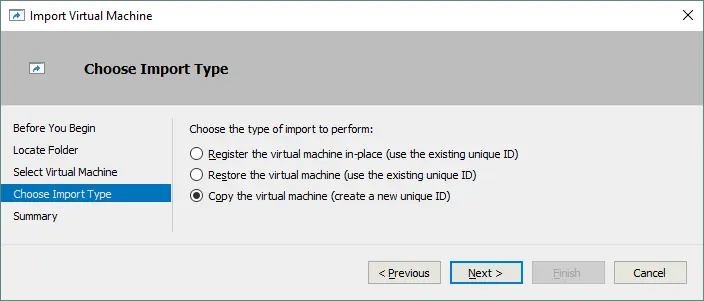
- Choose Import Type. There are 3 options here:
- Register the virtual machine in-place. This option should be used if a VM is located on the same Hyper-V host but was unregistered on the host for some reason. The machine’s unique ID is preserved in this case – the VM will function as if it has not been moved or copied.
- Restore the virtual machine. Similar to the option above, this option differs in that it should be used if a virtual machine is copied from a source location to a target location, but this VM no longer runs on the source location (for example, if VM files have been manually copied as a backup of a Hyper-V VM and then restored from that backup). The unique ID of the VM is also preserved.
- Copy the virtual machine. This is the most universal option of the three listed. You can import a VM multiple times and run those VMs. A new unique ID is generated each time you use this option to import a VM. For the sake of simplicity, this option has been selected in the current example and displayed in the screenshot below.
- Choose Folders for Virtual Machine Files. Select where to store your VM configuration, checkpoints, and smart paging.

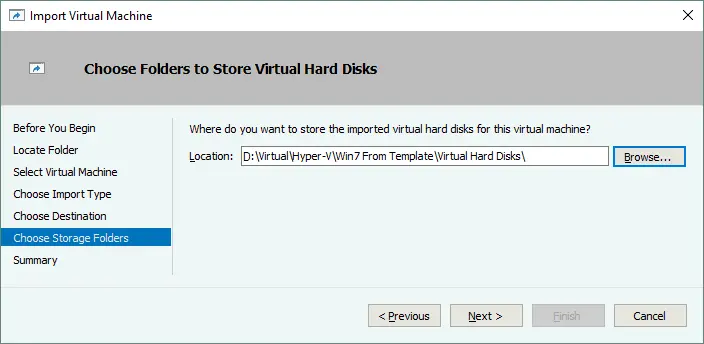
- Choose Folders to Store Virtual Hard Disks. You should also select where virtual disks will be stored.
Now, you will be able to find the VM clone in the list of your VMs in Hyper-V Manager. The name of this VM is the same as that of the source VM used to create the Hyper-V VM template. You can rename it if necessary.
Configuring a VM after Cloning
Start your VM, select your country, keyboard layout, hostname, and create a new user. Note that existing users are not deleted automatically (with the sysprep configuration we explained).
Next, the Microsoft Windows license agreement is displayed. Select your time zone, and your Windows running on the Hyper-V VM clone will display the login screen. You can delete any new users created during Windows “first run” if you no longer need those users.

How to Clone a Hyper V VM in Windows Admin Center
Windows Admin Center is a newer tool to manage Windows, Hyper-V, Azure and other Microsoft services. This tool can be used to clone a virtual machine, for example, if you want to create a virtual machine template from a specially prepared VM clone in SCVMM.
To clone a VM in Windows Admin Center:
- Download Windows Admin Center:
https://www.microsoft.com/en-us/evalcenter/download-windows-admin-center/
- Install Windows Admin Center by running the downloaded installer file on a Hyper-V host.
- Log in to Windows Admin Center in a supported web browser by using a link as follows:
https://hostname_or_IP_address_of_Hyper-V_host:443
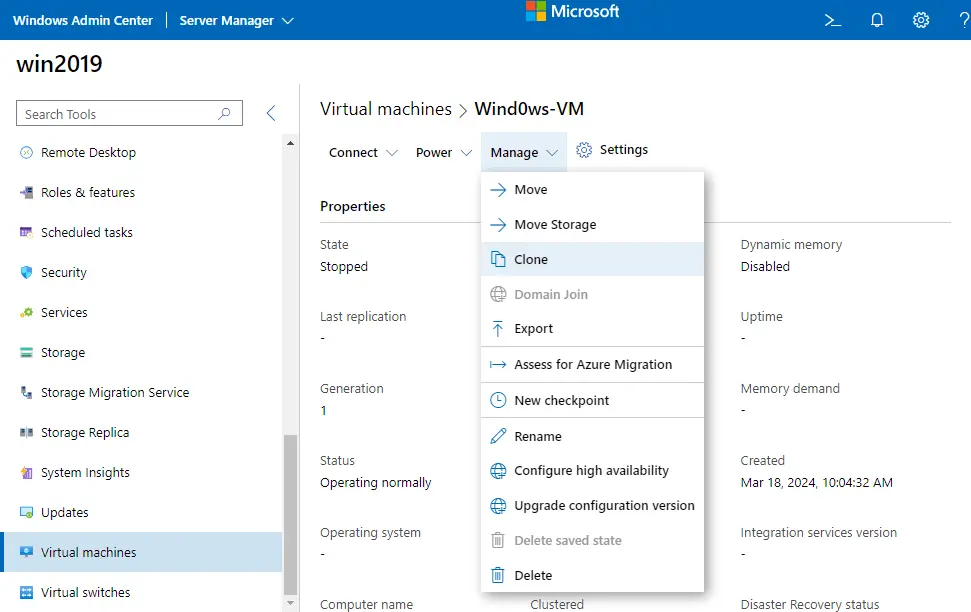
- In the left pane of the Windows Admin Center web interface, go to Virtual machines and select (click) the VM that you want to clone. We select Wind0ws-VM in this example.

- Once you have selected a VM, click Manage > Clone to clone this Hyper-V VM.
- Select a configuration path. This is where the Hyper-V VM clone will be located. Hit OK to continue.
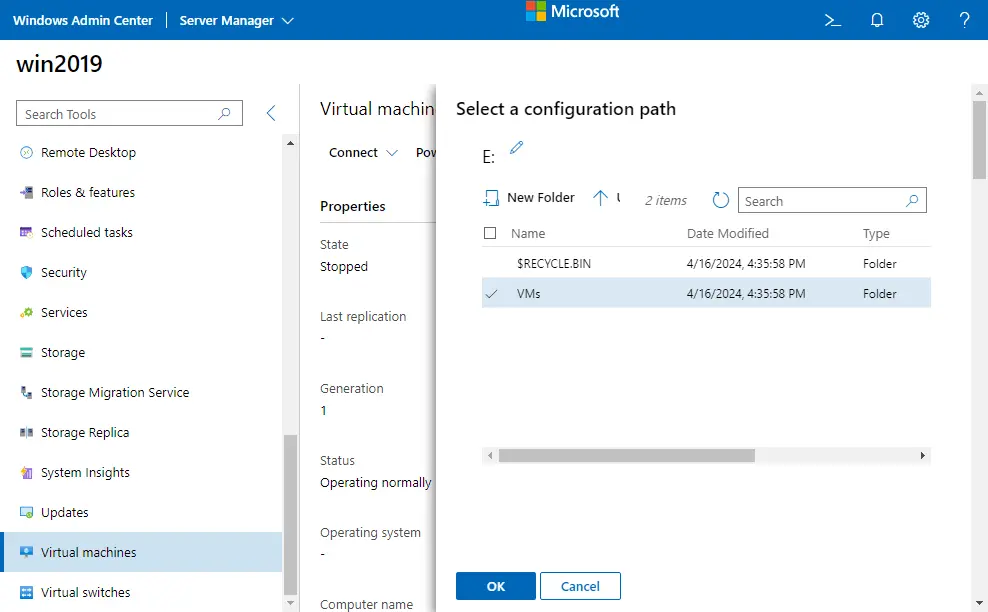
- Enter a VM clone name, for example, Windows-clone. You can still change the destination path for the Hyper-V VM clone. Click Clone to proceed.

- You may see a notification message if you haven’t run sysprep in a guest OS before:
Cloning will cause the parent virtual machine to reboot one or more times. Do you wish to continue (Yes/No).
- If the Windows Admin Center asks you for guest OS credentials, specify the administrative credentials to continue.
- You may see a notification message if you haven’t run sysprep in a guest OS before:
Wait until the Hyper-V VM clone is created.
Creating a Virtual Machine Template in SCVMM
You can use Microsoft System Center Virtual Machine Manager (SCVMM) to create VM templates and Hyper-V VM clones. This is an advanced solution to manage Windows server environments. A library for VMs and templates is available in this solution.
You can use a Hyper-V VM clone to create a VM template because the VM clone will be transformed into a template and will not be available as a regular VM. By using this approach, you avoid a situation where the original VM becomes unavailable after creating a template. A specially prepared VM copy (clone) will disappear from the list of VMs at the end of this scenario.
- Open SCVMM. Go to Libraries > Templates > VM Templates and click Create VM Template.

- At the Select Source step of the Create VM Template Wizard, select From an existing virtual machine that is deployed on a host. Hit Browse to select a VM.
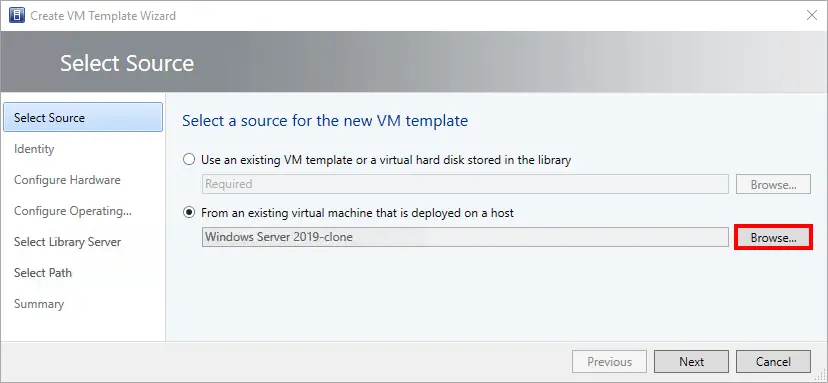
- Select the VM that you want to convert into a Hyper-V VM template. We use a prepared VM clone (Windows Server 2019-clone) for this purpose.

- A message warns you that the original VM will be unavailable after creating the template from this VM. Hit Yes to continue.

- Enter a name for the VM template. We are creating a template for a Windows Server 2019 VM (the template name is Server2019-templ). Hit Next at each step of the wizard to continue.

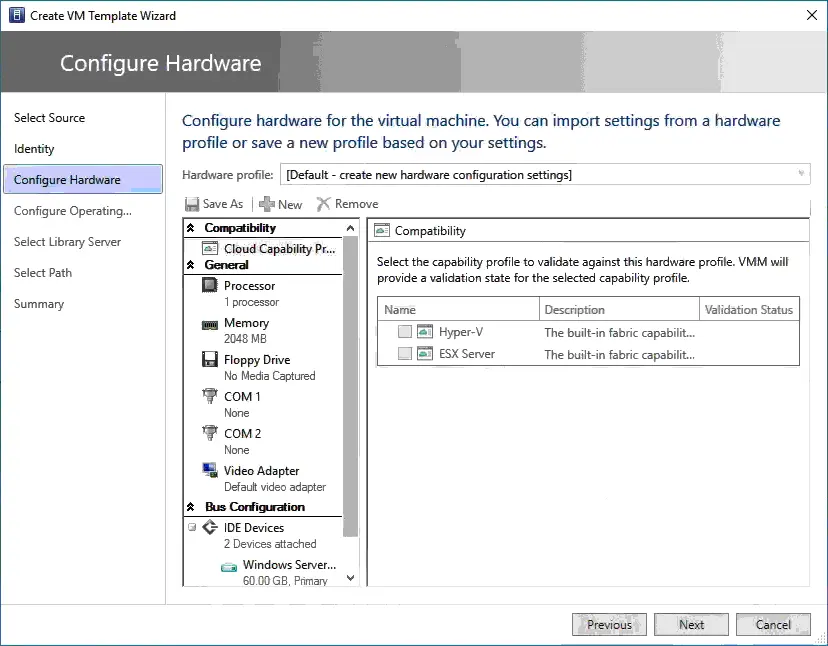
- Check virtual hardware for a VM template.
- Select the correct guest OS profile based on the OS installed in the VM you are converting into a template. We select Windows Server 2019 Base and Windows Server 2019 Standard.

- Select a library server for the VM template.

- Select the share location to save this virtual machine template. Enter the UNC path of the SMB file share where the library is located. Click Browse and define the correct location.

- At the Summary step, click View Script to see the PowerShell script that contains all the settings previously selected and allows you to perform the same task of VM template creation in PowerShell.

You can find an example of a PowerShell script below:
$VM = Get-SCVirtualMachin -VMMServer localhost -Name "Windows Server 2019-clone" -ID "00000000-0000-0000-0000-000000000000" | where {$_.VMHost.Name -eq "win2019.domain.local"}$LibraryServer = Get-SCLibraryServer -VMMServer localhost | where {$-.Name -eq "win2019.domain.local"}$GuestOSProfile = Get-SCGuestOSProfile -VMMServer localhost | where {$_.Name -eq "Windows Server 2019 Base"}$OperatingSystem = Get-SCOperatingSystem -VMMServer localhost -ID "11111111-1111-1111-1111-111111111111" | where {$_.Name -eq "Windows Server 2019 Standard"}$template = New-SCVMTemplate -Name "Server2019Templ" -RunAsynchronously -VM $VM -LibraryServer $LibraryServer -SharePath "\\win2019.domain.local\SCVMMLibrary" -GuestOSProfile $GuestOSProfile -JobGroup 2222-2222-2222-2222-222222222222 -ComputerName "*" -TimeZone 20 -FullName