VMware Workstation Pro vs VMware Workstation Player: A Complete Comparison Guide
As a virtualization market leader, VMware offers products for a wide range of users. Its enterprise-grade line includes VMware vSphere products like ESXi, which is a type 1 hypervisor. VMware also offers type 2 hypervisors like VMware Workstation Player (or VMware Player) and VMware Workstation Pro (or VMware Workstation).
Type 2 hypervisors are installed on the underlying host OS running on the physical machine. These differ from type 1 hypervisors like vSphere and Microsoft Hyper-V, which are installed on the physical machine directly. The format of VMs in Workstation and Player is the same, but it differs from the VM format used in ESXi.
In this blog post, we cover the main similarities and differences between VMware Player and VMware Workstation Pro by looking at different parameters and settings. Note that in this article, we use version 15.1 for the comparison, but the main points and configuration steps are identical for newer versions like 17.5.
Requirements
The requirements for installing VMware Player and VMware Workstation Pro are the same. These requirements are:
CPU. A 64-bit Intel or AMD processor with 1.3 GHz or faster core speed, except for some Intel Atom models as well as Hondo, Ontario, Zacate, and Llano AMD processors. Processors produced after 2011 are strongly recommended as they must support Intel VT-x or AMD-V instructions. A detailed up-to-date CPU compatibility list is available on VMware’s website.
RAM. At least 2 GB of memory is required, though 4 GB or more is recommended. Keep in mind that you should have enough memory for the correct operation of your host OS, including applications running on the host OS, and for VMs, including guest operating systems and applications running on them.
Disk space. About 1.2 GB of free disk space is required for application installation. VMware Workstation 15 uses about 700 MB of disk space after installation, and VMware Player 15 uses about 250 MB of disk space after installation. You should also have enough available disk space to create virtual machines and store virtual machine files.
Host operating system. A 64-bit Linux or Windows distribution with a graphical user interface (GUI) is required.
Supported Guest Operating Systems
The list of supported guest operating systems is the same for VMware Player and VMware Workstation Pro. The most common guest operating systems that can run on VMware Workstation Pro and VMware Workstation Player are:
- Linux family: Debian-based (Debian, Ubuntu, Kubuntu, Xubuntu, Lubuntu, Mint), Red Hat-based (Red Hat, CentOS, Fedora, Oracle Linux, TurboLinux), SUSE (Open SUSE, SLES), Mandriva etc.
- Windows family: Windows 3.1, NT, Millennium, 95, 98, 2000, XP, Vista, 7, 8, 8.1, 10; Windows Server 2000, 2003, 2008, 2012, 2016.
- Solaris 10 and 11
- FreeBSD
- Nowell NetWare
- MS-DOS
- VMware ESXi
You can also install macOS on VMware Workstation Player or VMware Workstation Pro as this OS is not supported by default. To do that, you should configure your machine to enable installing macOS on a VMware VM.
Limits of VM Settings
You can create large, powerful VMs (16 virtual processors, 64 GB of RAM, 3 GB of video RAM) in both VMware Workstation Player and VMware Workstation Pro. If the guest OS installed on a VM has a 32-bit architecture, it cannot use more than 4 GB of RAM in most cases. This is the limit of the 32-bit architecture, not of the VMware products.
NOTE: Windows Server 2003 32-bit can use more than 4 GB of RAM due to PAE (physical address extension) but with memory limitations for running applications. By default, a maximum of 2 GB of memory can be addressed for each application, but this setting of the application’s memory address space can be tuned up to 3 GB.
For older versions of VMware Player and VMware Workstation that can be installed on a 32-bit host OS, if your computer has more than 4 GB of RAM but your host OS recognizes only 4 GB, you will not be able to utilize that unused memory for virtual machines running in VMware Workstation or Player.
VMware Workstation Pro provides the following features and VM options that are not available in VMware Player:
- Auto Protect automatically takes VM snapshots at the specified regular time interval when a VM is powered on. AutoProtect snapshots are not available for VMs running in VMware Player even if the VM was created and configured in VMware Workstation Pro.
- Guest Isolation. You can enable or disable the use of the drag & drop and copy/paste features from a host to guest and the other way round. Disable these features and disable networking if you want your VM to be completely isolated from the host OS. VMware Tools must be installed on a guest OS for the guest isolation feature to be available.
- VNC Connections. You can use this built-in feature in VMware Workstation Pro to connect to your VM remotely to the VNC client without installing the VNC server on the VM. The VNC client must be installed on the machine from which you are connecting to the VM. To connect to a VM, you should specify the IP address and port of a host machine on which VMware Workstation Pro is installed. Be aware that there are some limitations when you connect to a VM by using VNC, for example, you cannot edit VM settings, change the VM state, copy/paste data, etc.
- Advanced options provide some additional options, including firmware type (BIOS/UEFI), gathering debugging information, process priorities, etc.

Running Multiple VMs Simultaneously
VMware Workstation Pro allows you to run multiple VMs simultaneously. You can switch between tabs in one window of the VMware Workstation interface and manage each running or stopped VM. Run as many VMs as you wish, but make sure that there are enough hardware resources on your physical computer to support them.
VMware Workstation Player doesn’t provide an interface with tabs, and you can select only one VM in the Window of VMware Player when a VM is not running. You can try to run multiple instances of VMware Workstation Player when starting the first VM in one instance and starting the second VM in another instance. As a result, each VM will be running in separate windows of VMware Player.
VM Snapshots
VM snapshots allow you to save a virtual machine’s state at a specific point in time and then revert back to that state after changes have been made in the VM. When a snapshot is taken, a differencing virtual disk is created, and all changes made in the VM since that moment are written to that differencing virtual disk. VM data is not copied or duplicated when a snapshot is taken. As a result, VM snapshots are not a substitute for backups.
VMware Workstation Pro supports snapshots. You can create multiple snapshots, revert to any snapshot, and delete unnecessary snapshots. A complex snapshot hierarchy often resembles a tree with branches. You can view all taken snapshots in Snapshot Manager. Taking a snapshot is easy: you can simply click one button in the GUI or go to VM > Snapshot > Take Snapshot in the menu. A snapshot can be taken when a VM is powered on, powered off, or suspended.
VMware Workstation Player doesn’t support snapshots, and you won’t find the option in the VMware Player UI. The only action you can do instead of taking a snapshot is to suspend (pause) the VM when it is in a running state and copy the VM files to another location. If something goes wrong with your primary VM that was temporarily suspended, you can open the VM copy or overwrite the files of the source VM with the files of the VM copy. If your original VM is powered off, you can just copy VM files, and use this VM copy, should something go wrong with your original VM.
NOTE: If VM snapshots have already been taken in VMware Workstation Pro and you open such a VM in VMware Player, you cannot revert to these snapshots or delete them. The VM will start from the last state of this VM in VMware Workstation. If you reverted a VM to a snapshot in VMware Workstation and then opened that VM in VMware Player, the VM will be opened in the state of that snapshot.
VM Cloning
VMware Workstation Pro has a built-in clone feature that allows you to clone a VM from the current VM state or from an existing snapshot. You can create a linked clone of a VM and a full clone.
A linked clone is a reference to the source (parent) VM, and the virtual disks of the source virtual machine are shared with the VM clone. A snapshot of the parent VM is taken when a linked clone is created. All changes made with a parent VM and VM-clone are written in the corresponding differencing virtual disk. Hence, changes made with a linked clone don’t affect the parent VM and vice versa. A linked clone must have access to the parent VM, otherwise the linked clone cannot be used. The main idea behind using linked clones is saving disk space.
A full clone is a complete copy of a parent VM in its current state. A full clone made from a linked clone is a fully independent VM and doesn’t need a parent VM to be available. A full clone consumes more disk space but has higher performance. In VMware Workstation Pro, you can create a VM clone by going to VM > Manage > Clone. If VM files, such as virtual disks, are located in different directories, VMware Workstation Pro will automatically find and include all needed data in the VM clone.
Export a VM to an OVF template is available out of the box in VMware Workstation Pro, but not in VMware Workstation Player. OVF is the open virtualization format that is platform-independent and can be used for mass deployment of pre-configured virtual machines.
VMware Workstation Player does not possess any VM cloning functionality. You can create a full VM clone by copying all VM files manually. Shut down the VM, then go to the directory where your VMs are stored and copy the directory with all VM files to this location or to another location. Then in the menu of VMware Workstation Player, go to Player > File > Open and open the VM clone that you have created manually without special tools. Rename the opened VM clone to avoid confusion. If the virtual disks of your VM are located in different directories, it may not be convenient to clone the VM manually.
If you need to export a VM to an OVF template, you should manually download and install the Open Virtualization Format (OVF) Tool, which is a utility with a command line interface.
Sharing VMs
VMware Workstation Pro contains a great feature for sharing VMs with other users who have VMware Workstation Pro or VMware Fusion Pro installed on their machines. Sharing VMs allows you to avoid VM cloning if you have a good network connection and you connect to VMs remotely.
Some drawbacks of VM clones are that they require additional disk space and clone synchronization between machines. An advantage of VM sharing is the rational usage of resources. You can assemble a powerful computer, install VMware Workstation Pro, run multiple shared VMs on that machine, and connect to those machines remotely from laptops that don’t have sufficient performance for running VMs (you should define the IP address of a target host machine on which VMs are shared). Another case for using VM sharing is the impossibility of using standard remote access protocols such as SSH, RDP, VNC/RFB, etc. When you have shared a VM, your VMware Workstation Pro works as VMware Workstation Server. A VM can be shared in VM > Manage > Share.
VMware Workstation Player doesn’t provide any VM sharing features.
Connecting to Remote Servers
VMware Workstation Pro can be used to connect to ESXi hosts, vCenter servers, and Workstation servers. Connecting to vCenter servers and ESXi servers allows you to edit roles and permissions, manage VM power actions, enter maintenance mode for an ESXi server, or restart or shut down the server in addition to creating a new VM on an ESXi host (without using vSphere Client). You can manage remote VMs in a similar fashion to how you manage VMs running on your host machine on which VMware Workstation is installed.
VMware Workstation Player cannot connect to a remote vCenter server, ESXi host, or Workstation server. VMware Player can connect to VMware Horizon FLEX Server only.
Virtual Network Settings
For VMs opened in both VMware Workstation Pro and VMware Workstation Player, VM network settings can be edited. You can add virtual network adapters and configure the adapters to work in Bridged, NAT, and Host-Only networks. The NAT network is called VMnet8, the Host-Only network is called VMnet1, and the Bridged network is called VMnet0 by default.
VMware Workstation Pro contains the Virtual Network Editor with which you can edit virtual networks – change network subnets, change IP addresses of virtual gateways and DHCP servers, in addition to changing the range of DHCP-leased addresses. Moreover, with the Virtual Network Editor, you can create multiple networks and configure them as needed. For example, you can also create VMnet5 as a NAT network, VMnet6 as a Host-Only network, and VMnet10 as a Bridged network. Each bridged network can be bridged with different physical network adapters. In VMware Workstation Pro, a physical network adapter to be bridged can be selected in the Virtual Network Editor. The Virtual Network Editor can be found in the menu: Edit > Virtual Network Editor.
VMware Workstation Player doesn’t provide any additional options to edit networks. There is no Virtual Network Editor. You cannot change the IP addresses of virtual networks, including the IP addresses of virtual gateways, DHCP servers, etc. As for bridged networking, you can select a physical network adapter to be bridged in the VM settings after selecting the Bridged network by pressing the Configure Adapters button.
Restricted/Encrypted VMs
VMware Workstation Pro has a built-in access control feature, which can be used for VM encryption and restrictions. Enabling encryption prevents unauthorized VM access such as reading data from VM virtual disks, reading and editing VM configuration files, etc. After entering the encryption password, a VM becomes available.
Enabling restrictions protects a VM against unwanted changes to VM configuration and allows you to set the expiration date for a VM (after which date, a VM will not start). A VM must be encrypted before enabling restrictions. The encryption password and restrictions password may be different.
In VMware Workstation Pro, you can enable/disable encryption and restrictions for VMs as well as configure parameters of encryption/restriction. If you would like to set access control, go to Edit > VM Settings, select the Options tab, then select Access Control.
VMware Workstation Player can open encrypted VMs after entering the encryption password. From that point, you can edit VM settings and start the VM. VMware Player cannot edit encryption and restriction settings – you cannot encrypt a VM, and you cannot disable the encryption set in VMware Workstation Pro. Restricted VMs can be opened by only a licensed version of VMware Player. See the section about licensing below for more details.
Raw Device Mapping
Both VMware Workstation Pro and VMware Workstation Player allow you to use a physical disk or its partition of a host machine in a virtual machine. This feature is called raw device mapping (RDM) and can be used when a VM needs to have direct access to the physical disk of the host machine. For example, you can use RDM when a physical disk contains a lot of data, and you do not wish to create a new virtual disk for copying all that data. This particular mapped disk is called the RDM disk.
Nested Virtualization
When discussing VMware Workstation Pro vs Player in the context of nested virtualization, it is necessary to mention that both solutions support nested virtualization and can run a VM inside another VM. To run a nested VM, you should open the main VM, edit virtual machine settings, and in the processor settings of the Hardware tab, select the checkbox Virtualize Intel VT-x/EPT or AMD-V/RVI.
Other Features Available for Both VMware Player and Workstation
3D acceleration in a VM. You can run applications that use a 3D engine, for example, Windows applications that require DirectX or Linux/Windows applications that use OpenGL.
Autologin. This option allows you to avoid entering a login and password manually after loading the operating system on a VM.
Shared Folders and Drag & Drop help you exchange files between host and guest operating systems. Text, images, and other information used by applications can be copied from a guest OS and pasted into the host OS and vice versa.
Seamless desktop integration (Unity mode). Windows in the guest applications can be displayed among windows of the applications in the host operating system, much as you would run guest OS applications in the host OS. Unity works only for Windows operating systems in the latest versions of VMware Workstation Pro and VMware Player.
Differences in the User Interface
As you can imagine after reading the section about running multiple VMs simultaneously, the graphical user interfaces (GUI) of VMware Workstation Pro and VMware Player are quite different. VMware Workstation Pro generally has more features and provides more options, which results in a more detailed GUI with more menus and buttons.
VMware Workstation Pro
After shutting down a guest OS in a VM, the VM tab in the window of VMware Workstation Pro and the main application window do not close. You can manually close VM tabs even if a VM is running. You can observe a running VM in the VM list in the left pane of the VMware Workstation Pro window.
In the screenshot below, you can also see a VM that is in a suspended state (on pause). The VM parameters and the VM state are displayed in the VM tab in the interface of VMware Workstation Pro. When a VM is suspended, the preview of the VM interface is saved in a screenshot taken at the moment when you send the command to suspend the VM.

In the left pane of the VMware Workstation Pro window, the VMs you have opened are listed, and their status (stopped, running, suspended) is displayed. This pane is called a VM library. You can click the VM name in the list to open this VM in the tab. Right-click the VM to see additional options in the context menu. These can be used to remove a VM from the list, rename a VM, open VM settings, open a VM folder, etc.
When a VM is running, you can switch to the VM’s tab and see the user interface of the guest OS on a virtual display in 100% scaling. At the top of the window, you can see a menu bar and the VM state change button. The pressing of said button is equal to pressing Ctrl+Alt+Del in a guest OS. There are three buttons for operating with VM snapshots (Take a snapshot, Revert a VM to the snapshot, Manage snapshots). After the snapshot buttons, you can find the buttons for managing the user interface: Show or hide the library, Show or hide the thumbnail bar, Enter full screen mode (for a VM), Enter Unity mode; Show or hide the console view, Keep aspect ratio stretch / Free stretch.

In the right bottom corner of the VMware Workstation Pro window, the virtual devices indicators are located in the status bar (see the screenshot above).
HDD LED. The indicator is active when a virtual hard disk is active. If there are two virtual hard disks, then two HDD indicators are displayed, and so on. This rule is true for other devices displayed in the indicators panel of the status bar. You can click the indicator icon and edit the device settings.
CD/DVD Drive. If read operations from a physical CD/DVD drive or from a virtual CD/DVD drive with an ISO image are performed, this indicator is active (similarly to a LED on the front panel of a physical optical drive).
Network. The indicator of a virtual network adapter of a VM blinks similarly to how the LED near the Ethernet port of the physical network adapter would when the adapter is connected to the network, and data is sent and received.
Printer. You can connect to a virtual printer if virtual printers are enabled in Preferences.
Sound device. The audio card of the host machine can be used for audio input and output in the VM.
USB device 1. All USB devices connected to your physical machine can be connected directly to a virtual machine due to the USB passthrough feature of VMware hypervisors (a USB device will be disconnected from the host OS in this case until you disconnect a USB device from a VM). In the current example, two USB devices are connected to the host machine, and two grey USB indicators are displayed. If, for example, you connect a USB webcam to a VM, the grey USB icon will be replaced with the webcam icon.
USB device 2. See the previous point.
Message log. You can read the message log for the current VM. If some devices are disconnected from a VM, if some features are disabled, or warnings are displayed. You can find this information in the message log.
VMware Player
The graphical user interface of VMware Player is much simpler. There is no list of used VMs displayed in the left pane of the window and no VM tabs. In the upper toolbar, you can see the Player menu, the VM state change button, Send Alt+Ctrl+Del to virtual machine, Connect to VMware Horizon FLEX Server, Enter full screen mode, Enter Unity mode.
The Connect to VMware Horizon FLEX Server button is present only in the GUI of VMware Workstation Player and is absent in the GUI of VMware Workstation Pro. This option is needed for downloading a VM if your VM is on a Horizon FLEX server. VMware Player can be used as VMware Horizon FLEX Client. Read more about VMware Horizon in this blog post.
You can right-click the VM and power on the VM, edit VM settings, rename the VM, remove the VM from the library, or delete the VM from a disk.

When you power on the VM, you can see a virtual BIOS and then a user interface of the guest OS after loading, but the list of VMs in the VM Library is no longer available. You cannot create a new VM in this window of VMware Player or edit the settings of other VMs now.
Indicators that resemble the indicators of VMware Workstation Pro are located in the top right corner (note that you should expand the indicators panel).

After shutting down a guest OS (or powering off a VM), the VMware Player window is closed automatically. If you close the VMware Player window, the VM is suspended by default (you can change this setting).
Command Line Interface
The command line interface (CLI) can be used for both VMware Workstation Pro and VMware Player, but there are differences between them.
VMware Workstation Pro
In VMware Workstation Pro, the CLI is enabled out of the box, and you can use the vmrun command line VMware management tool right after installing VMware Workstation Pro. In Windows, you should open CMD and go to the VMware Workstation installation directory for running commands with vmrun. Note that C:\Program Files (x86)\VMware\VMware Workstation is used by default and vmrun.exe is located there. You can add this path to the PATH environment variable to make it possible to execute vmrun from any directory.
Consider these examples of using vmrun in VMware Workstation Pro:
To list existing snapshots for a VM:
vmrun -T ws listSnapshots "C:\Virtual\Server2016\Windows Server 2016.vmx "
To list only running VMs:
vmrun -T ws list
Where -T ws means that VMware Workstation Pro is being used.

VMware Player
In the case of using VMware Player in order to use vmrun, you should manually install VMware VIX API, which is not installed automatically when you install VMware Player. Unlike VMware Workstation Pro, VMware Workstation Player doesn’t include VMware VIX API by default after installation. VMware VIX API is a special API (application programming interface) that allows you to automate managing VMware hypervisors and control VMs with scripts. VMware VIX API includes the vmrun command-line utility.
- Download VMware VIX API for Linux or for Windows from VMware’s official site without charge and install it.
NOTE: If after installing VMware VIX API on Windows, vmrun doesn’t work due to the missing MSVCR120.dll file and an error occurs, you should install a C++ Redistributable pack which contains a set of dynamic-link libraries. The exact text displayed in the error window is: The computer can’t start because MSVCR120.dll is missing from your computer. Try reinstalling the program to fix this problem (see the screenshot below).

- Download 32-bit and 64-bit installers of the C++ Redistributable pack. It is recommended that you install both 32-bit and 64-bit packages on 64-bit Windows. In our example, Windows 7 64-bit and VMware Workstation Player 15.1.0 are used.
- Install the C++ Redistributable pack. If this doesn’t help and you get the same error, try renaming some system files.
Warning: Perform all the following actions including actions with system files at your own risk. Improper manipulations with system files can harm your system.
- Rename msvcr120_clr0400.dll to msvcr120.dll in C:\Windows\System32\ and C:\Windows\SysWOW64\ directories.
- Try to execute vmrun now. For example, we can power on an existing Ubuntu VM:
vmrun -T player start "C:\temp\Virtual Machines\Ubuntu\Ubuntu.vmx"Where -T player means that VMware Player is used (this parameter is different for VMware Workstation Pro and VMware Workstation Player).
- You may get an error when using vmrun for starting a VM on VMware Player:
Unable to connect to host.
Error: The specified version was not found.

In order to fix this error, edit the vixwrapper-config.txt file that is located in the VMware VIX installation directory (C:\Program Files (x86)\VMware\VMware VIX by default). The default file view in our case is shown on the screenshot below.

- Change 19 to 20 and 14.0.0 to 15.0.0 in the text as following:
# Workstation 15.0.0
ws 20 vmdb 15.0.0 Workstation-15.0.0
player 20 vmdb 15.0.0 Workstation-15.0.0
# latest un-versioned
ws 20 vmdb e.x.p Workstation-15.0.0
player 20 vmdb e.x.p Workstation-15.0.0
# EOF
Where:
15.0.0 is the version of VMware Workstation Player which you would like to use with the command line vmrun tool.
Workstation-15.0.0 is the name of the directory.
20 is 19+1 (one point is added, similarly as a version 14 + 1 is a version 15).
- Rename the Workstation-14.0.0 sub-directory to Workstation-15.0.0 in the VMware VIX installation directory (C:\Program Files (x86)\VMware\VMware VIX by default).

- Now try to use vmrun for VMware Player. In our case, vmrun is now working correctly, and we have used the command line interface to start the VM in VMware Player.

- Now you can add a directory where vmrun.exe is located in the PATH environment variable for executing vmrun from any location in your Windows system.
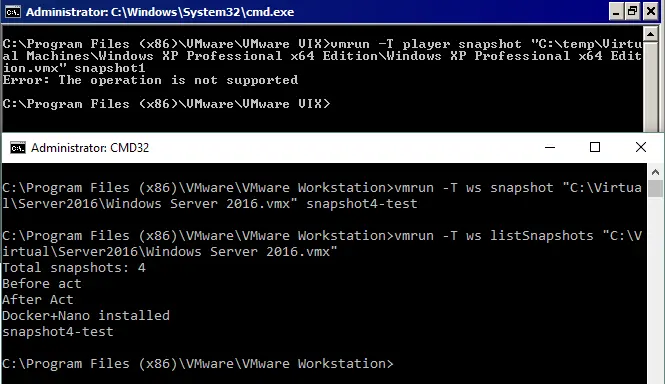
In both VMware Workstation Pro and VMware Workstation Player, you can list the available commands with the vmrun --help command. The output of this command is identical for both VMware products, but don’t try to cheat. For example, you cannot take a VM snapshot when you have only VMware Player installed, despite the fact that snapshot options are displayed by vmrun. The error message will be displayed if you try to operate with features that are not supported by VMware Player.
In the screenshot, you can see the output of the same command for VMware Player (error) and VMware Workstation Pro (no output, but the command has been executed successfully and a snapshot has been taken).
Licensing
VMware Workstation Player is a free product for personal and non-commercial use. Note that using VMware Player in non-profit organizations is deemed commercial use. Universities can install VMware Player for free for their students if the university is a member of the VMware Academic Program. According to the rules, universities can use VMware products that have an academic license for research, teaching, and discovery, but not for building the virtual infrastructure of the university or the entire campus, non-profit usage, and non-academic purposes. Home users can use a free version of VMware Player without any concern. VMware Player can be downloaded on VMware’s official website:
Users who need to install VMware Player for commercial use should buy a license. After applying a license, you can run restricted virtual machines in VMware Player (note that restricted machines can only be created in VMware Workstation). The price for a commercial license of VMware Player 17 is $150 for new installations. Users who want to upgrade their previous version of VMware Workstation Player to VMware Workstation Player 17 can do that for $80. You can find the latest price on the VMware/Broadcom website.
VMware Workstation Pro can be used in free trial mode right after installation for a 30-day trial period. Once the trial period has expired, you need to apply a license. The price for a new license for VMware Workstation Pro 15 is $250 at the moment of writing this article. Upgrading from a previous version of VMware Workstation to the latest version costs $150. For example, users who have versions 12 and 14 can upgrade to version 15 (or from version 15 to 17). All licensing details are available on VMware’s website, where you can also download the installer. The academic discount is available for users and organizations that are members of the VMware Academic Program.
When installing VMware Workstation Pro, VMware Workstation Player is also installed automatically. When you apply a license for VMware Workstation Pro, VMware Player becomes licensed as the commercial version.
VMware Player and Workstation don’t include licenses for guest operating systems such as Windows.
Summary
VMware Workstation Pro is a powerful application aimed at a wide range of users including IT enthusiasts, system administrators, testers, programmers, and other specialists. Convenient integration with vSphere allows you to basically manage VMs running on ESXi hosts without using vSphere Client. Sharing VMs and connecting to other Workstation servers on which VMs are shared adds more flexibility and allows you to use resources rationally. VMware Workstation Pro allows you to deploy a set of VMs connected to customized virtual networks, run them simultaneously, take snapshots, encrypt VMs, etc., for example, you can deploy a Kubernetes cluster. If you are looking for a powerful desktop hypervisor, VMware Workstation Pro is the ultimate solution.
Home users for whom creating and running VMs as well as editing basic VM settings is enough can use VMware Player and save money because VMware Player is free for non-commercial use. If your budget is limited, but you need to work with VMs for commercial use, select VMware Player and save costs.
Both VMware Player and Workstation can be managed with the CLI, but manual system configuration is required to use the CLI for VMware Player.
Let’s summarize all reviewed options in a single VMware Workstation Pro vs Player comparison table.
| VMware Workstation Pro | VMware Player | |
| Creating VMs | + | + |
| Large VMs support | + | + |
| Guest isolation | + | – |
| VNC connections | + | – |
| VM advanced options | + | – |
| Running multiple VMs | + | –* |
| VM snapshots | + | – |
| Auto Protect VM snapshots | + | – |
| VM cloning | + | –* |
| Sharing VMs | + | – |
| Connecting to remote servers | + | – (except Horizon FLEX) |
| USB pass-through | + | + |
| VM virtual adapter settings | + | + |
| Virtual Network Editor | + | – |
| Create Restricted/Encrypted VMs | +/+ | –/– |
| Run Restricted/Encrypted VMs | +/+ | +(free)/+*(licensed only) |
| Raw device mapping (HDD) | + | + |
| Nested Virtualization | + | + |
| 3D acceleration in a VM | + | + |
| Autologin | + | + |
| Shared Folders and Drag & Drop | + | + |
| Seamless desktop integration | + | + |
| Graphical user interface | + | + |
| Command line interface | + | +* (VIX API required) |
| Licensing | 30-day free trial/250 $ | Free(non-commercial)/150$ |
*Similar operations (but not the exact same) can be done manually.
Conclusion
Hopefully, this information can help you make the right choice and install the hypervisor that is the best fit for you. You can also read our comprehensive comparison of VMware and VirtualBox and VirtualBox vs Hyper-V.